Free Constellation - To Temper Thyself and Journey Far Event Guide
◆ New: 6.0 Luna I, 2025 Anniversary, 6.0 Codes
◆ Phase 1: Lauma, Aino, Nahida, 6.0 Chronicled Wish
◆ Nod-Krai: Lunoculus, Nod-Krai Quests
◆ Events: To Temper Thyself, Free 5-Star, Clink Clash
◆ Future: Flins, Yelan, 6.1 Luna II, Nefer, UGC
The Free Constellation Event is the To Temper Thyself and Journey Far in Genshin Impact Luna I. Check out how to obtain the free constellation, see which characters are best to choose, and the event's release date here!
List of Contents
How to Get Free 5-Star Constellation
Complete Daily and Weekly Training Goals
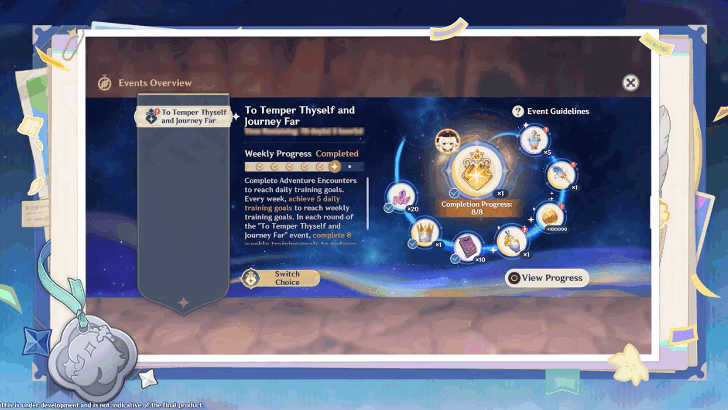
To claim your free 5-star character constellation, Travelers must first complete 8 Weekly Training Goals during the event period, which basically will require you to do 5 days worth of dailies per week over the course of 8 weeks.
Here is the summary on how to complete this event:
- Claim 4 Daily Commission rewards and expend 120 Resin in a single day.
- Do this 5 times per week.
- Get 1 weekly progress for completing that week.
- Repeat process until you get 8 weekly progress to get the Free Constellation.
Complete Dailies 5 Times Per Week
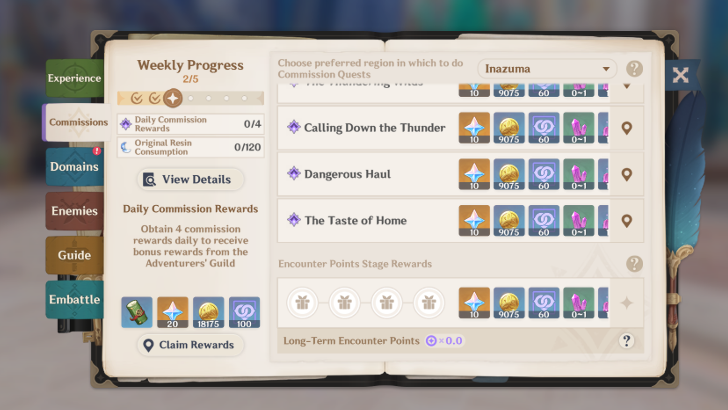
Claim rewards from 4 Daily Commissions or Encounter Points, and expend 120 Original Resin in a single day to complete daily training goals. Complete daily training goals 5 times in a week to complete the Weekly Training Goal for that week.
Repeat 8 Times to Get the Constellation
Once you complete that week, you will get 1 Weekly Progress completion on your event screen, which also gifts you tiered rewards like Dust of Enlightenment or Sanctifying Elixirs.
Repeat this process in 8 weeks in total to claim your chosen character's constellation!
Claim One Character Constellation of Your Choice
During the event, a character's constellation can only be claimed once, and if you've already claimed one before from this event, you cannot claim another on the next rotation.
Note that the selection opportunity does not carry over to the next season, so remember to claim the Stella Fortuna once it's available to you!
Best Character Constellation to Choose
We will list down the best constellations for each character, ordered by priority. Note that most of the characters have a lackluster C1 and so we're mostly focusing on constellations which can be a good stepping stone should you wish to obtain more of them from their reruns.
| Character | Strengths |
|---|---|
|
|
・Quite possibly one of the best constellations to pick with the eve of Lauma, her C1 and C2 provides an extension of her Skill duration and Hydro and Dendro RES reduction. |
|
|
・C1 lowers his Energy Cost requirement. ・Strongly recommended to get his C2 if you already have his C1, as it provides a periodic off-field healing and single instance of Dendro application even with Baizhu not actively using any of his skills. |
|
|
・Drastically improves her playstyle as her C1 removes Stamina cost on her Charged Attacks while at her Skill state. |
|
|
・Speedrunning meta pick if you already have her C1 as it reduces enemy DEF. |
|
|
・Reduces Anemo RES by 40%, which is a rare debuff. ・Lower in the priority if you're already choosing her as the free 5-star Standard Character every Anniversary Patch. |
|
|
・If you already have her C1, Yae Miko's totems now unlocks the Level 4 state. This also increases her totem's range, which lets you attack enemies from afar. |
|
|
・Dehya's C1 improves her gameplay as HP now matters on her damaging multipliers. ・Lower in the priority if you're already choosing her as the free 5-star Standard Character every Anniversary Patch. |
|
|
・Hydro-elemental reactions are buffed by 15%. ・Lower in the priority if you're already choosing her as the free 5-star Standard Character every Anniversary Patch. |
|
|
・Increases his Skill charge by 1, which also lowers his Energy cost for the second or subsequent Elemental Bursts. |
|
|
・Tighnari is the best DPS to pick from the Standard Banner, the more constellations you have near to C6, the closer he is to current S-tier C0 DPS. ・Lower in the priority if you're already choosing her as the free 5-star Standard Character every Anniversary Patch. |
|
|
・Her Elemental Burst will now have 2 smaller versions of the attack, which provides more coverage and more damage to her placement-reliant Burst. |
|
|
Premium support for Cryo DPS, gives an additional charge on her Skill which provides more energy and allows her to use both the Normal and Hold variants of her skill. |
|
|
・Reduces opponents' Cryo RES when they are hit by her Level 2 Charged Attack. |
|
|
・If you already have his C1, C2 is his best early constellation damage spike. |
|
|
・His stopping point. None of his early constellations are particularly ground-breaking but if you need some power spike, these are the constellations to get if you already invested some constellations on him. |
|
|
・If you already have his C1, C2 is another QoL which alleviates his Energy Costs a bit in Mono-Geo. |
|
|
・If you already have his C1, Albedo's C2 allows his Elemental Burst to lighten his kit's split-scaling issues, as DEF will benefit both his Skill and Burst. |
|
|
・Most of her constellations are just for her on-field kit, which isn't that recommended to use if you're not using her Bloom teams. However, C2 is the only supportive constellation available for her and by far the most worthwhile one that increases her Skill's healing bonus. |
|
|
・None of his constellations are particularly interesting nor powerful to get in terms of DMG output aside from his C4. ・Lower in the priority if you're already choosing him as the free 5-star Standard Character every Anniversary Patch. |
|
|
・None of her constellations are particularly powerful to get, but her C1 now generates energy on her Skill, which previously doesn't, which is also something! ・Lower in the priority if you're already choosing him as the free 5-star Standard Character every Anniversary Patch. |
|
|
・His early constellations aren't that spectacular and only gives him slight damage boosts. Only pick Ayato if you have him at C5 and you want his C6 powerspike. |
|
|
・Eula's constellations are dated. Only pick Eula if you have her at C5 and you want her C6 powerspike. |
|
|
・Keqing's constellations aren't necessarily good, but all of them provide some damage bonus up to C4. ・Lower in the priority if you're already choosing her as the free 5-star Standard Character every Anniversary Patch. |
|
|
・Yoimiya's constellations are very lackluster and only provides some small damage increase. |
|
|
・Tartaglia doesn't have a good constellation when it comes to his main role in DPS. You won't need to get his cooldown reduction constellations as managing it depends on the player's output. Should you wish to have a constellation for Tartaglia, C4 at least gives him some supportive capibilities as it'll provide him some off-field Hydro application. |
To Temper Thyself and Journey Far Season 1 Details
Season 1 Duration and Countdown
| Season 1 Duration |
|---|
| September 10, 2025 - December 1, 2025 |
| Countdown until the End of Season 1 |
| Season 2 Start |
| December 8, 2025 |
To Temper Thyself and Journey Far Season 1 will last from the 6.0 Luna I update until December 1, 2025, lasting for 12 weeks. After the first season ends, the next season starts on the next Monday at 04:00 AM (Server Time).
List of Available Characters
| All Available 5-Star Characters | |
|---|---|
|
|
|
The characters available in Season 1 of the event include characters from the Standard Banner, as well as some characters released before Version 3.6. Note that Kazuha, Yelan, and Alhaitham aren't included in the choices.
To Temper Thyself and Journey Far Event Information
Free 5-Star Stella Fortuna Details

| Event Start | September 10, 2025 |
|---|---|
| Event End | December 1, 2025 |
| How to Unlock | Adventure Rank 14+ Complete Archon Quest Prologue - Knights of Favonius Complete World Quest - Welcome to the Adventurer's Guild |
| Rewards |
What is the Free 5-Star Constellation Event?
To Temper Thyself and Journey Far is a permanent rotating event where you can claim a free constellation for your chosen 5-star character.
Other Current & Upcoming Events
To Temper Thyself and Journey Far Release Date
Releases in Version 6.0 Luna I
| Genshin Impact Version 6.0 Luna I | |
|---|---|
 |
|
| Phase 1 Date | September 10, 2025 |
To Temper Thyself and Journey Far releases in Version 6.0 - Luna I, on September 10, 2025, along with all the other new content in the upcoming version!
Version 6.0 Release Date and Banners
Genshin Impact Related Guides

Current Events
| Event Guide | Date and Rewards |
|---|---|
 Clink Clank Clash Clink Clank Clash
|
09/12/2025 - 09/29/2025
+ Weapon and Talent Up Materials |
|
To Temper Thyself and Journey Far
|
09/10/2025 - 12/01/2025
+ 5-Star Stella Fortuna |
 It Starts in Nod-Krai It Starts in Nod-Krai
|
08/24/2025 - 09/24/2025
|
Upcoming Events
| Event Guide | Date and Rewards |
|---|---|
 Dodoco's Blow-Up-Erative Bomb-Nanza Dodoco's Blow-Up-Erative Bomb-Nanza
|
09/29/2025 - 10/13/2025
|
 Silvery Flux Silvery Flux
|
10/01/2025 - 10/21/2025
|
 Overflowing Favor Overflowing Favor
|
10/06/2025 - 10/13/2025
Double Artifact Domain Drops
|
 Lightgleaner's Journey Lightgleaner's Journey
|
10/10/2025 - 10/21/2025
|
Permanent/Recurring Events
| Event Guide | Date and Rewards |
|---|---|
 Stygian Onslaught Stygian Onslaught
|
09/17/2025 - 10/21/2025
+ Dust of Enlightenment |
 Travelers' Tales Travelers' Tales
|
Permanently Available after Version 6.0
|
 Repertoire of Myriad Melodies Repertoire of Myriad Melodies
|
Permanently Available
|
 Test Run Test Run
|
Permanently Available
+ Ascension Materials |
 Hangout Events Hangout Events
|
Permanently Available after Version 1.4
+ Talent Materials + Specialty Dish |
 Baptism of Song Baptism of Song
|
Permanently Available
+ Free Barbara
|
 Daily Check-In Daily Check-In
|
2021/03/01 - Permanently Available
|
 Stellar Reunion Returnee Event Stellar Reunion Returnee Event
|
Permanently Available
+ Prototype Rancour |
Past Events
Comment
It's not working. Completed 5 times last week but now it still shows 0/8 completed.
Author

Free Constellation - To Temper Thyself and Journey Far Event Guide
Rankings
Gaming News
![2XKO Review [Closed Beta] | Riot Games Finally Steps Into The Ring](https://img.game8.co/4274934/6008986b07583b36b5b2b5b8072d0bed.png/show)

Popular Games

Genshin Impact Walkthrough & Guides Wiki
Hollow Knight: Silksong Walkthrough & Guides Wiki
Umamusume: Pretty Derby Walkthrough & Guides Wiki
Borderlands 4 Walkthrough & Guides Wiki
Wuthering Waves Walkthrough & Guides Wiki
Honkai: Star Rail Walkthrough & Guides Wiki
Pokemon TCG Pocket (PTCGP) Strategies & Guides Wiki
Pokemon Scarlet and Violet (SV) Walkthrough & Guides Wiki
Zenless Zone Zero Walkthrough & Guides Wiki
Clair Obscur: Expedition 33 Walkthrough & Guides Wiki


Recommended Games
Fire Emblem Heroes (FEH) Walkthrough & Guides Wiki
Yu-Gi-Oh! Master Duel Walkthrough & Guides Wiki
Persona 3 Reload Walkthrough & Guides Wiki
Once Human Walkthrough & Guides Wiki
Black Myth: Wukong Walkthrough & Guides Wiki
The Legend of Zelda: Tears of the Kingdom Walkthrough & Guides Wiki
Super Smash Bros. Ultimate Walkthrough & Guides Wiki
Monster Hunter World Walkthrough & Guides Wiki
Diablo 4: Vessel of Hatred Walkthrough & Guides Wiki
Elden Ring Shadow of the Erdtree Walkthrough & Guides Wiki


All rights reserved
Copyright© 2012-2024 HoYoverse — COGNOSPHERE. All Rights Reserved.
The copyrights of videos of games used in our content and other intellectual property rights belong to the provider of the game.
The contents we provide on this site were created personally by members of the Game8 editorial department.
We refuse the right to reuse or repost content taken without our permission such as data or images to other sites.
It works by a friend of me. Maybe there is a condition like, if you have not get the item, the cycle resets or so