Act 2 Complete Walkthrough and Secrets
★ Trending: Puzzles | Codes | Jeljin | NG+
☆ Starting out? Check our Beginner's Guide
┗ Combat | Builds | Weapons | Tier List
★ Walkthrough | Good Deeds | Mysteries
┗ Timeloops | Vaults | NPCs | Enemies
☆ Missables | Game Length | Trophies
This is a complete walkthrough for Act 2 in Hell is Us. Read on for a guide to finishing Act 2, where to find Points of Interest, and the secrets and puzzles in Act 2 here!
| ◄ Previous Act | Next Act ▶ |
|---|---|
| Act 1 | Act 3 |
List of Contents
Act 2 Complete Walkthrough
- Searching for the Keystone of Terror
- Searching for the Keystone of Rage
- Searching for the Keystone of Ecstacy
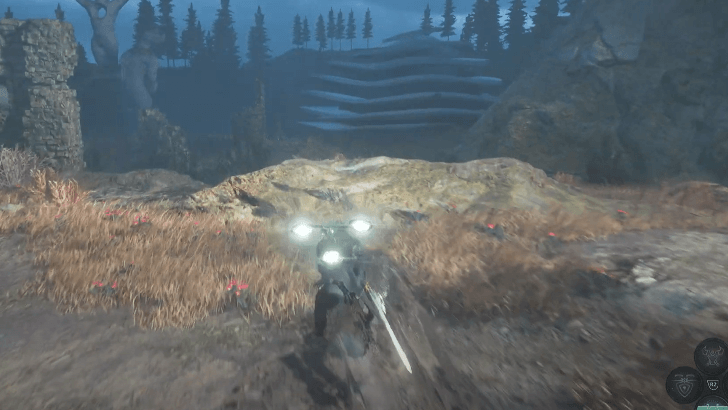
1. Searching for the Keystone of Terror
| Objectives | |
|---|---|
| 1.1 | 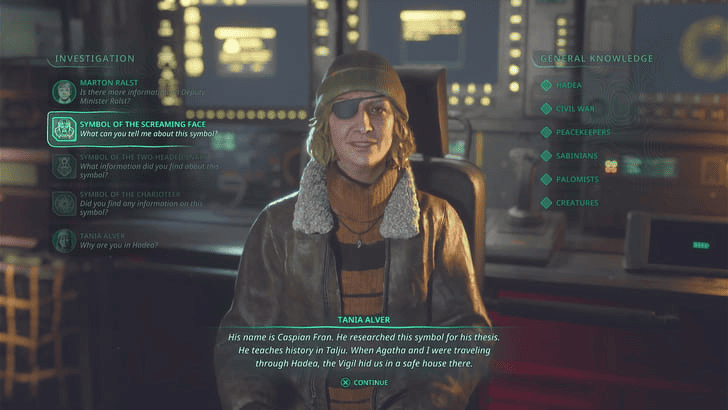 Return to the APC and ask Tania about the Symbol of the Screaming Face, then travel to Talju. |
| 1.2 | 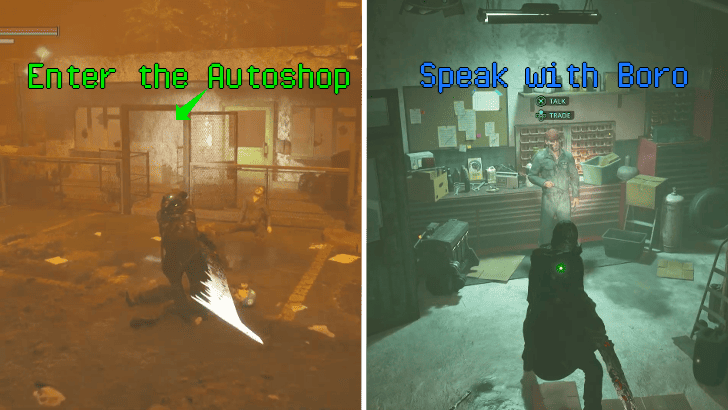 Look up to see Boro's autoshop sign and head towards it. Enter the building next to the gas station and talk to the Sheltered Mechanic, Boro Juven, and ask him about Caspian Fran's whereabouts. |
| 1.3 | 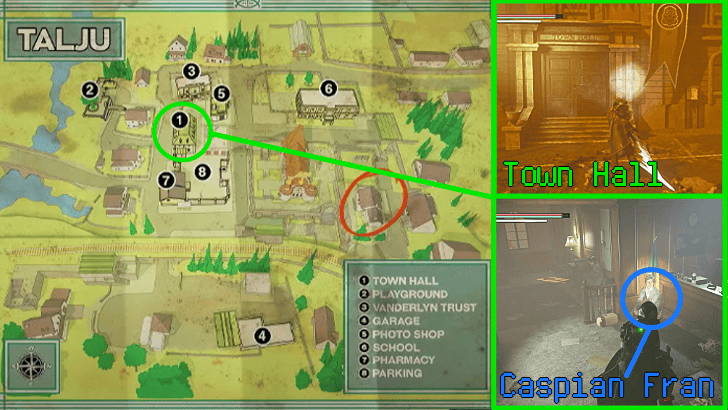 Go to the Town Hall and talk to Caspian near the front desk, ask him about the symbol, and he will ask you to look for his son. Receive the Walkie-Talkie after getting more information about this son. |
| 1.4 | 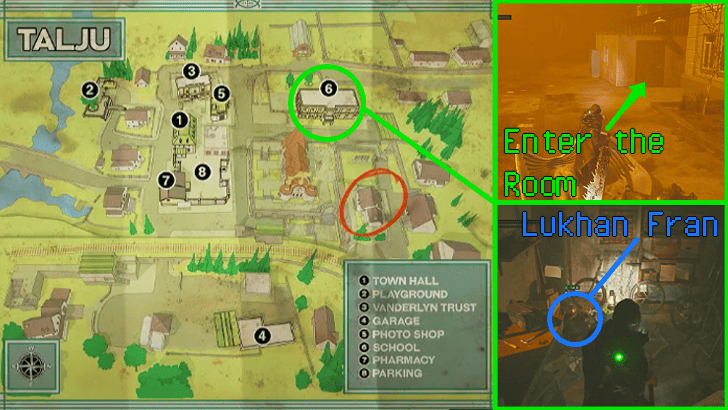 Look for Lukhan in the school northwest of the town; he will be in the maintenance room. Trade the Walkie-Talkie with Lukhan and return to Caspian to receive the keys to the Parking Lot. |
| 1.5 | 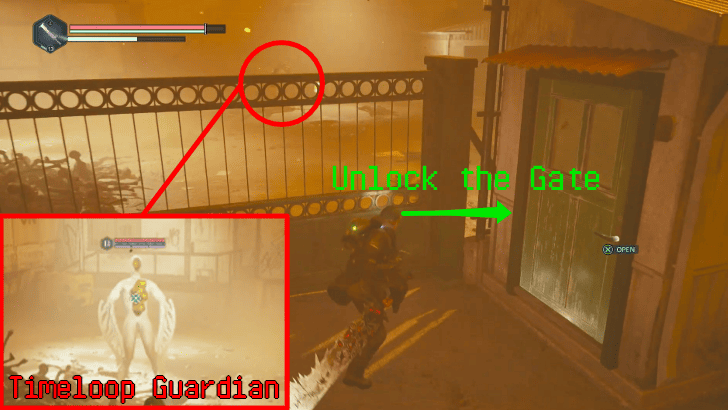 Open the Parking Lot security booth and use the PC to open the gate, then defeat the Timeloop Guardian inside. |
| 1.6 |  Use the back entrance to unlock a shortcut back to the Town Hall, then talk to Caspian and ask him about the Symbol of the Screaming Face and the Blood Queen, which unlocks the ability to travel to Marastan via the APC. |
| 1.7 | 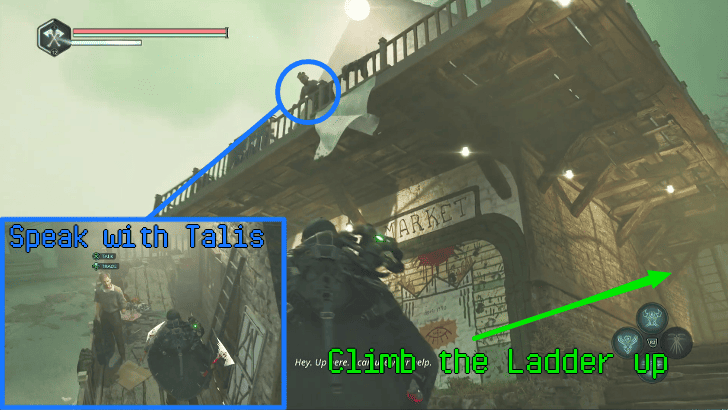 Travel to Marastan and follow the upward path. Look for Talis on the Marastan Market balcony, speak with him to get the task you need to complete to receive the Key - Statue. Defeat the enemies near the church, then return to Talis to receive the gate key to the Blood Queen's Observatory. |
| 1.8 | 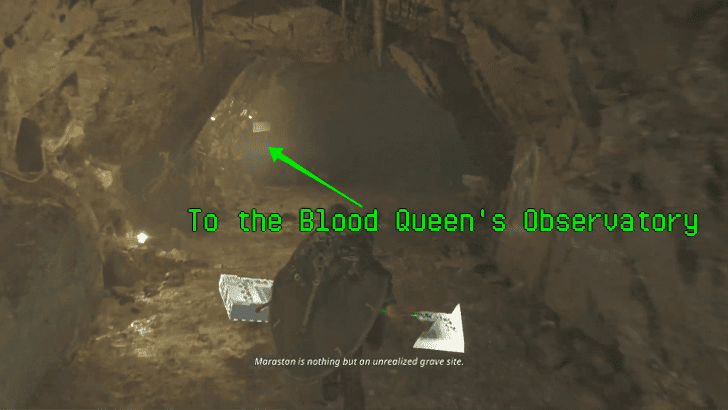 Head to the gate southwest of Talis and unlock it. In the intersection inside the tunnel, take the path to the left until you reach a ladder that leads to the statue’s head. Scan the painting on the wall for Eagle Puzzle Hint, then look through the telescope to find the Blood Queen's Tomb. |
| 1.9 | 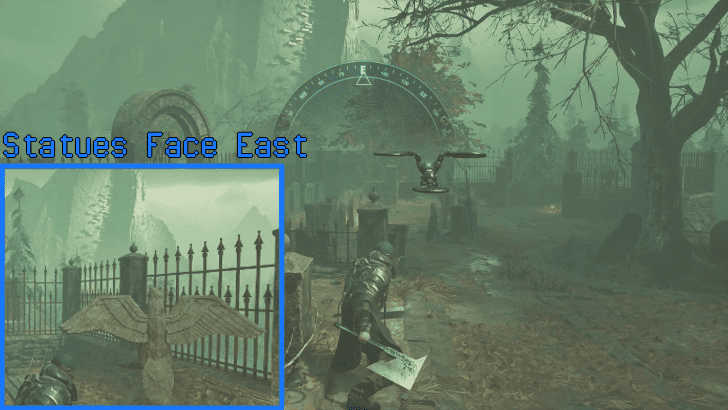 Head to the cemetery and solve the eagle statue puzzle by rotating all six statues to face east. Use your compass to check if they are facing the correct direction. Completing the puzzle opens up a way down to the tomb. ▶︎Marastan Eagle Puzzle Guide |
| 1.10 | 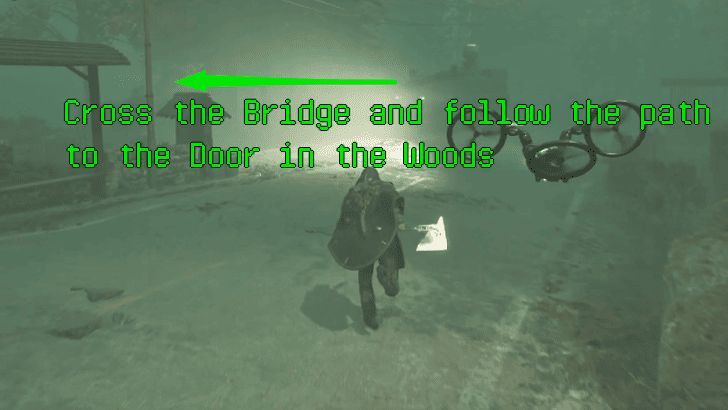 Enter the tomb and go through a series of narrow hallways and collect the Square, Oblique, and Angled Tablet Fragments. Head to the structure you saw through the telescope, exit the tomb, and go back to the area where the APC is and cross the bridge near the sign to enter the forest. |
| 1.11 | Continue east and search for the Puzzle Door in the Woods. To activate the puzzle, insert the matching Tablet Fragments into the pillars. Align the symbols on the pillars with the corresponding symbols on the floor to open the entrance. ▶︎Marastan Door Puzzle Guide |
| 1.12 | 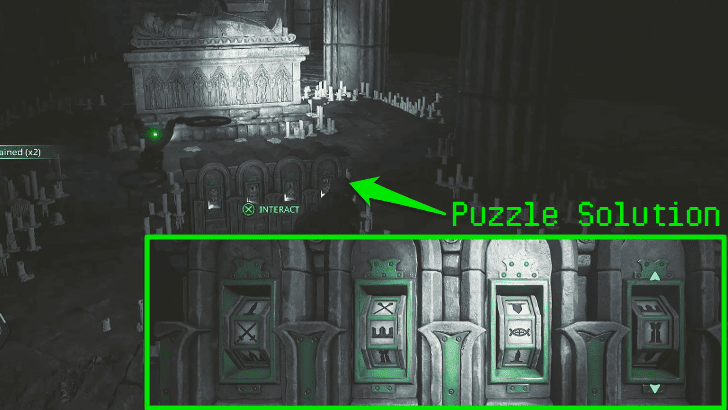 Proceed into the tomb until you reach the next puzzle. Solve this by revealing the symbols: Crossed Swords, Crown, Eye, and Tower. Note that the Crown and the Tower each have two different designs. Check the murals to determine which symbol you should input. Collect the Sword of the Blood Queen afterwards. ▶︎Marastan Symbols Puzzle Guide |
| 1.13 | 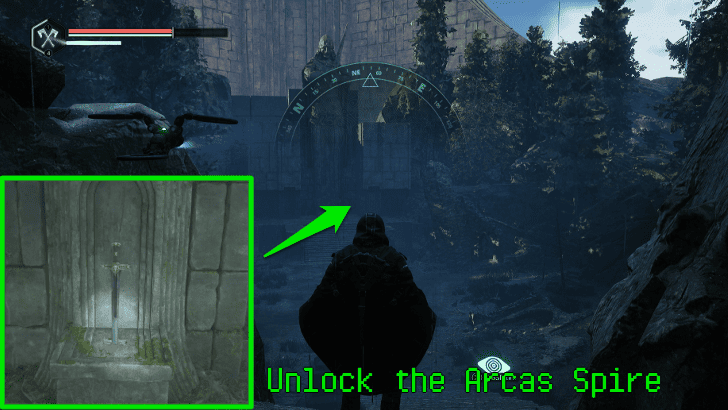 Return to the APC and travel to Senedra Forest, go to the northeast most area of the map to where the Arcas Spire is. Insert the Sword of the Blood Queen to unlock the entrance. |
| 1.14 | 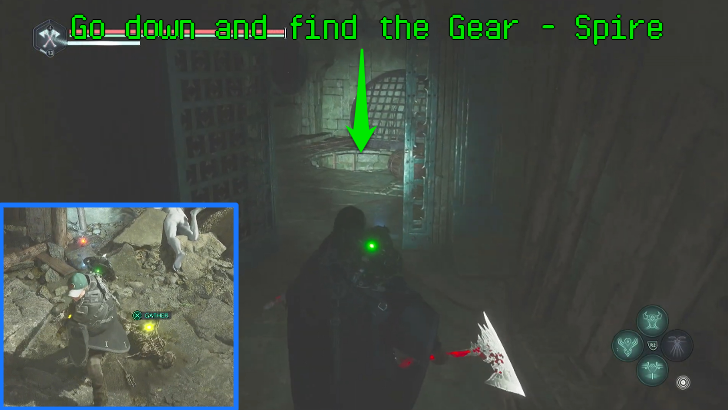 Follow the path and climb up the stairs. When you reach the end of the hall, turn righ,t and there will be a room with a ladder going down. Keep going down the scaffolding until you find the Gear - Spire near a pile of bones close to the elevator. |
| 1.15 | 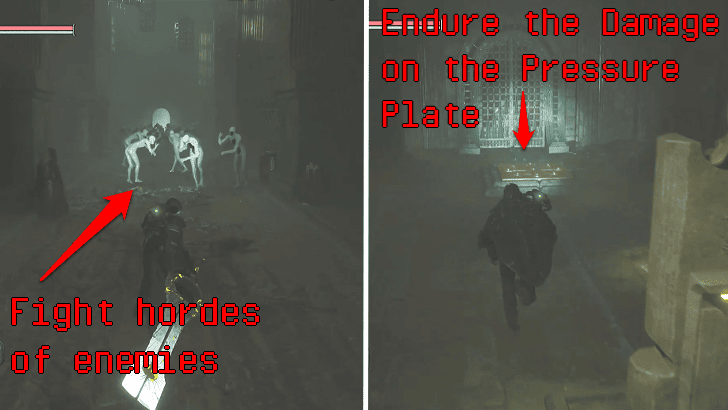 Go back to the elevator and use the gear to move up the tower. You'll find a door leading to another room with more enemies. Climb the spiral staircase and exit to the grand staircase, where a few more enemies await. At the end, you'll reach a room with a pressure plate. Step on it and endure the spike damage to proceed to the next area. |
| 1.16 | 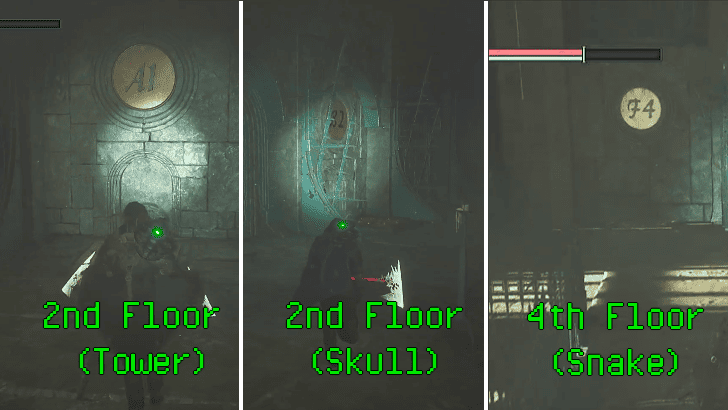 In the next room, step on the A1 pressure plate on the second floor, then pull the Tower lever. Next, step on the B2 pressure plate on the second floor, then pull the Skull lever. Finally, step on the F4 pressure plate on the fourth floor, then pull the Snake lever. Proceed through the unlocked door at the top and receive items. Continue climbing until you reach the area with the timeloop. ▶︎Arcas Spire Tile Puzzle Guide |
| 1.17 | 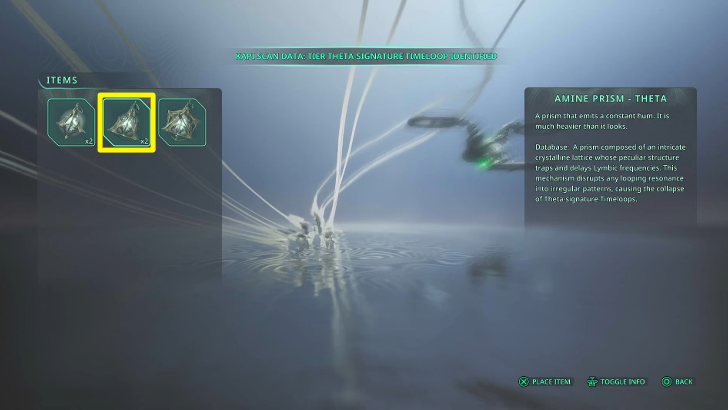 Defeat the three Timeloop Guardians in the area to gain access to the timeloop at the center. Afterwards, place the Amine Prism - Theta, obtained from the previous door, into the timeloop to collapse it. |
| 1.18 |  Interact with the gold item on the ground and face the Terror Haze Boss. Defeat the Boss by approaching the glitching pillars to make it spawn. Once it does, attack until its health bar is depleted. Afterwards, you’ll obtain the Keystone of Terror. Return to the APC and ask Tania about the Symbol of the Charioteer to unlock Jeljin. |
| ▲Return to List of All Act 2 Investigations▲ | |
Searching for the Keystone of Terror
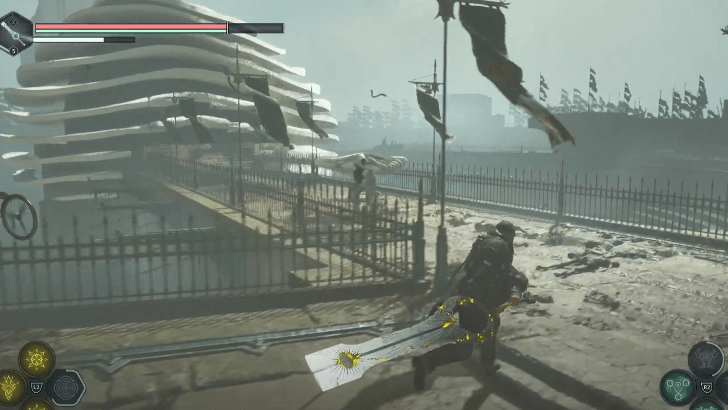
2. Searching for the Keystone of Rage
| Objectives | |
|---|---|
| 2.1 | 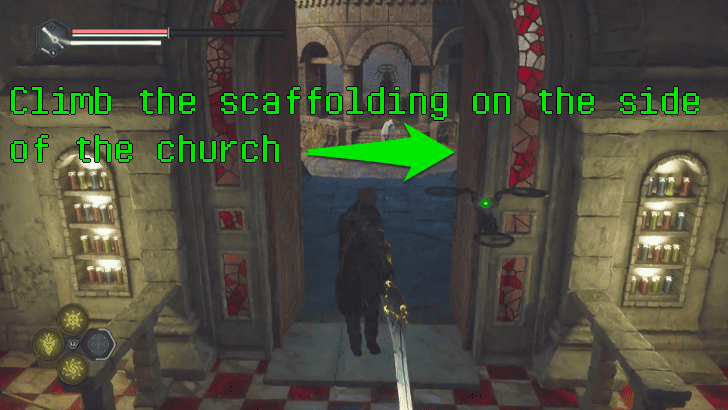 Travel to Jeljin via the APC. Enter the church, which is the tall building directly in front of you as you arrive. Exit through the door behind the dais and climb the scaffolding on the right side wall of the church. |
| 2.2 | 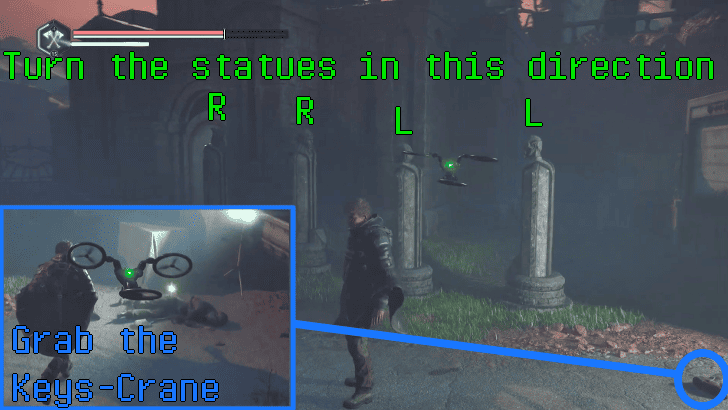 got to the other side and collect the Keys - Crane from the body near the statues. Solve the Dove Crypt puzzle by turning the statues in this order from left to right: Right, Right, Left, Left to open the entrance to the crypt, then scan the tablet inside. ▶︎Jeljin Dove Crypt Puzzle Guide |
| 2.3 | 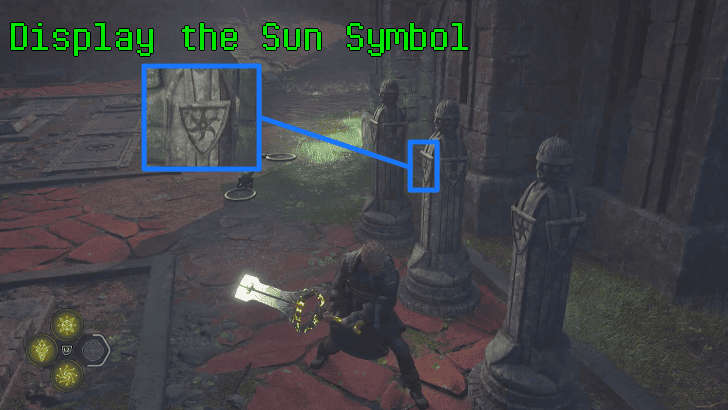 Find the crypt with the Flower symbol. Turn all statues to display the Sun symbol to unlock the entrance to the crypt, then scan the tablet inside for information. ▶︎Jeljin Flower Crypt Puzzle Guide |
| 2.4 | 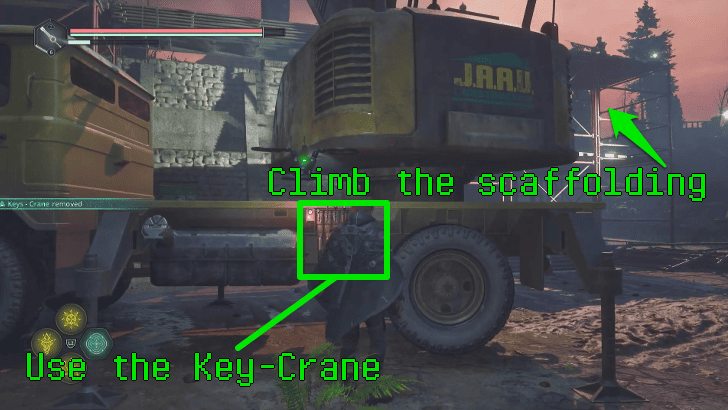 Exit the crypt and unlock the gate to the right. Use the Keys - Crane to unlock the crane's levers on its left side, then activate it to lower the crane to form a bridge for you to get to the other side of the scaffolding. |
| 2.5 | 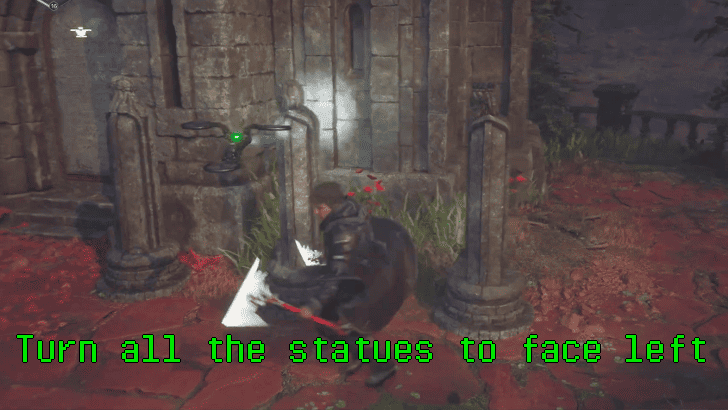 Climb the scaffolding and reach the Dagger crypt, where you'll have to turn the statues to face left to open the crypt. Scan the tablet inside for more information. ▶︎Jeljin Dagger Crypt Puzzle Guide |
| 2.6 | 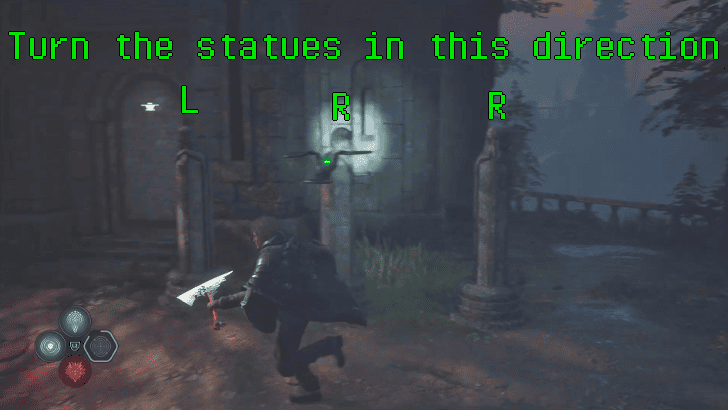 Go to the archeology camp and pass through the mausoleum and the cave until you reach the crypt with the horse symbol, and turn the statues in this order from left to right: Left, Right, Right to open the entrance to the crypt, then scan the tablet inside. ▶︎Jeljin Horse Crypt Puzzle Guide |
| 2.7 | 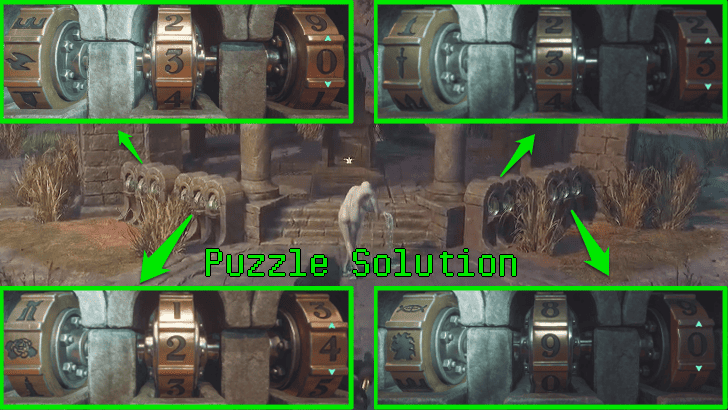 Return to the back of the church and solve the puzzle on the pergola by entering the following symbols and numbers from left to right: Dove-3-0, Rose-2-4, Sword-3-3, and Horse-9-0. Enter the newly opened chamber and defeat the enemies below to reach the tomb, where you’ll collect the Iron Seal - Fading and the Map of Hadea - Ancient, which unlocks travel to the Auriga Museum. ▶︎Jeljin Pergola Puzzle Guide |
| 2.8 | 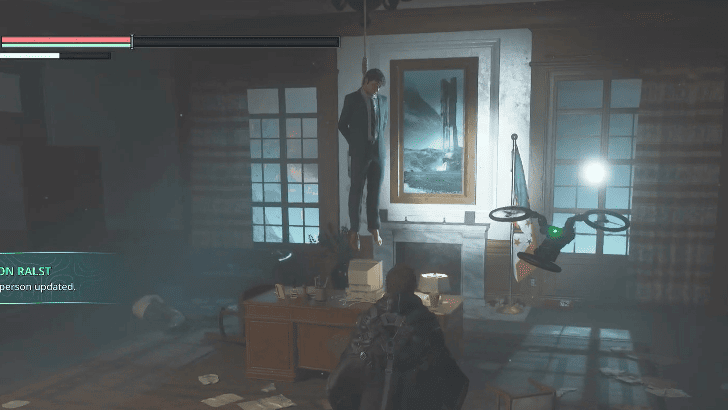 Before heading to the Auriga Museum, return to the APC and travel to Lethe - Ministry of Cultural Primacy. From the underground parking lot, go upstairs to the main office, where you’ll find Marton Ralst’s body hanging from the ceiling. |
| 2.9 | 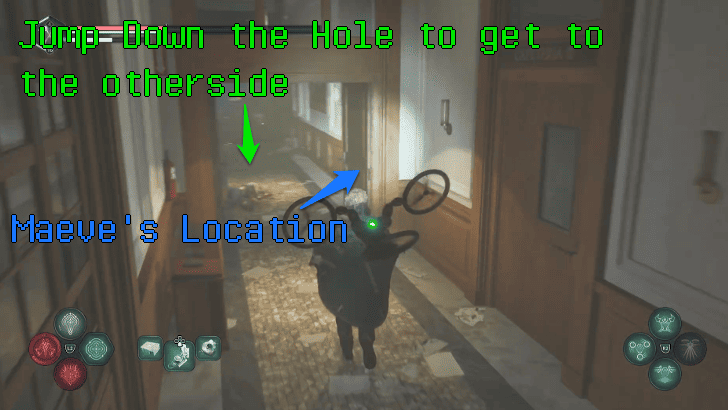 Continue further into Wing A and enter the cafeteria, where you’ll encounter a distressed woman trapped in a room. Exhaust her dialogue, then drop down to the lower floor near an enemy on the other side of Wing A. |
| 2.10 | 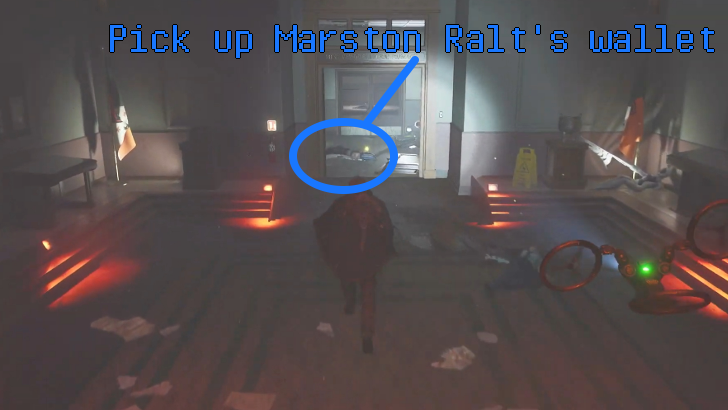 |
| 2.11 | 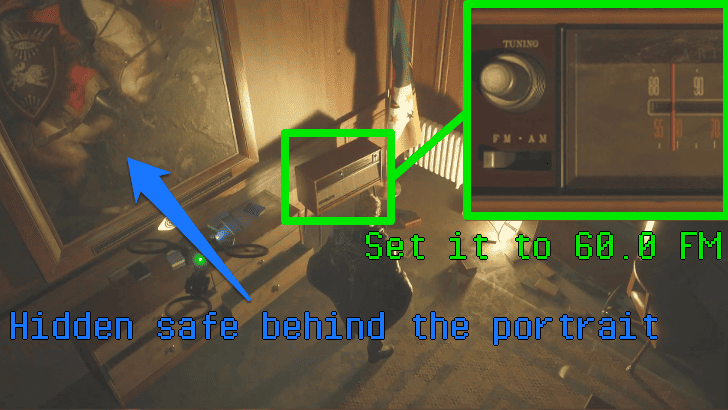 Access Marton's computer and enter the code: 773 to unlock it and collect more information. In the same room, interact with the radio and tune in to 60.0 FM, which should reveal the hidden safe behind the painting next to it. If nothing works, switch between AM and FM until it triggers. ▶︎Lethe - Ministry of Cultural Primacy Safe Lock Puzzle Guide |
| 2.12 | 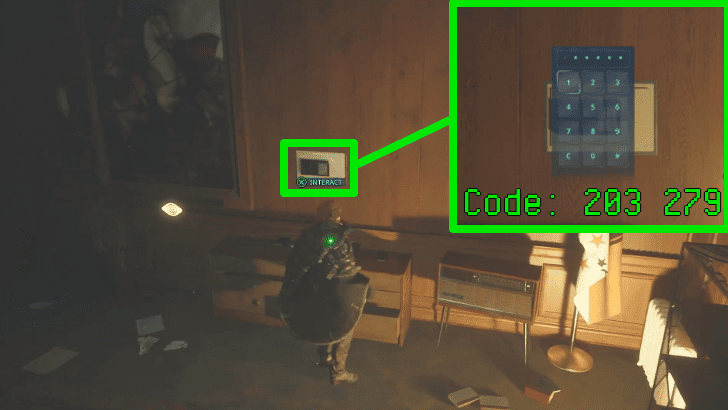 Enter the code: 203279 in the safe to unlock it and obtain the Iron Seal - Rising, and the Journal - Auriga Entrance. Return to the APC. Go back to the APC and travel to Auriga Museum. |
| 2.13 | 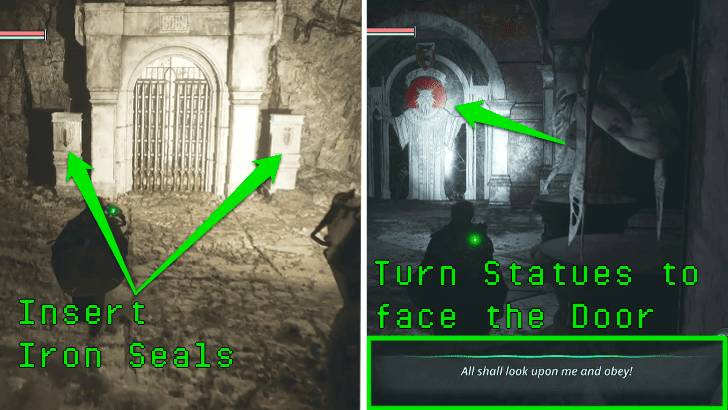 Insert the two Iron Seals to unlock the entrance to the museum. Inside, turn the four statues and make them face the door with the mural to open the entrance. ▶︎Auriga Museum Entrance Puzzle Guide |
| 2.14 | 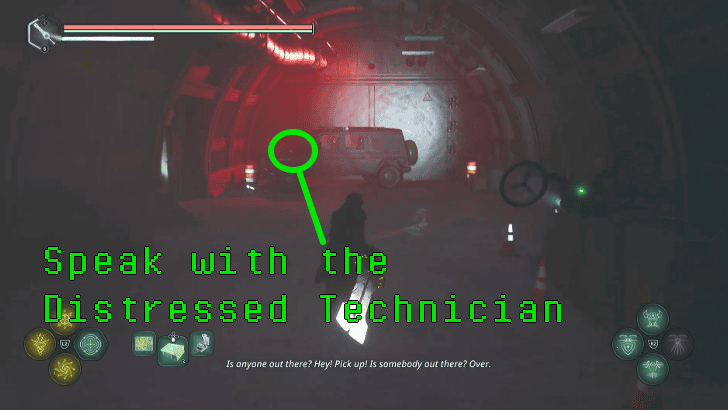 Pass through it and turn right, then descend the stairs through the emergency exit to reach B1 and talk to the Distressed Technician over the radio. |
| 2.15 | 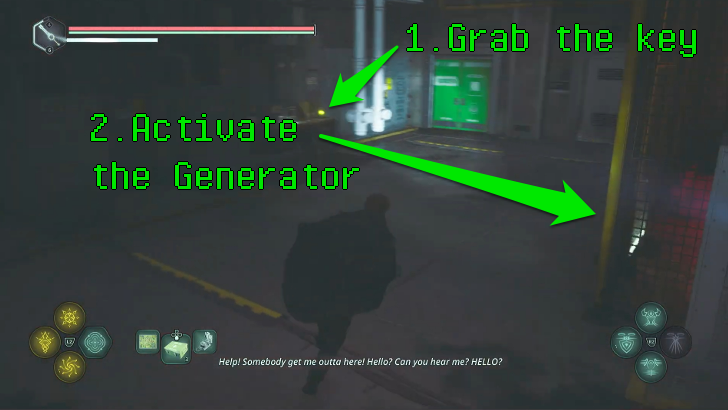 Go down to B2 and pick up the Keys - Maintenance by the desk with the computer and use it to unlock the generator gate. Pull the lever to activate the generator. |
| 2.16 | 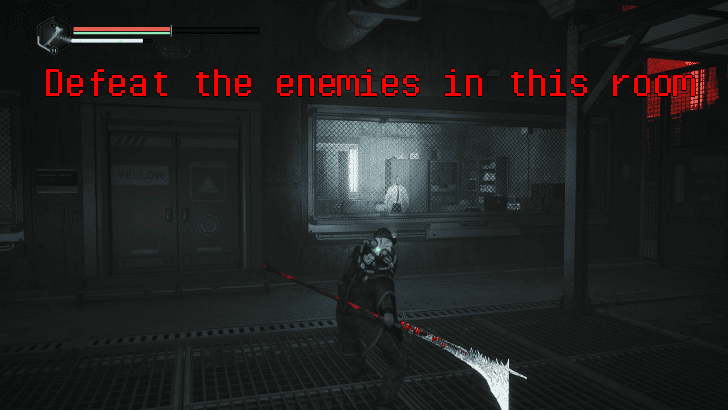 Use the key to access the maintenance room in B2, approach the grid and switch it to red, go into the red door beside the generator. Climb up the ladder and defeat all the enemies inside the training room. There is a man trapped behind the yellow doors. |
| 2.17 | 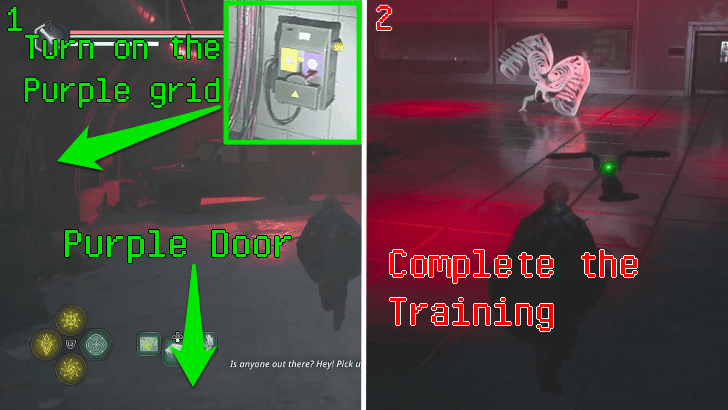 After defating all the enemies, go back to floor B1. Use the keys again to unlock the maintenance room. Activate the purple grid, then enter the training room on the same floor. You'll be fighting numerous waves of enemies, so make sure you're well prepared. |
| 2.18 | 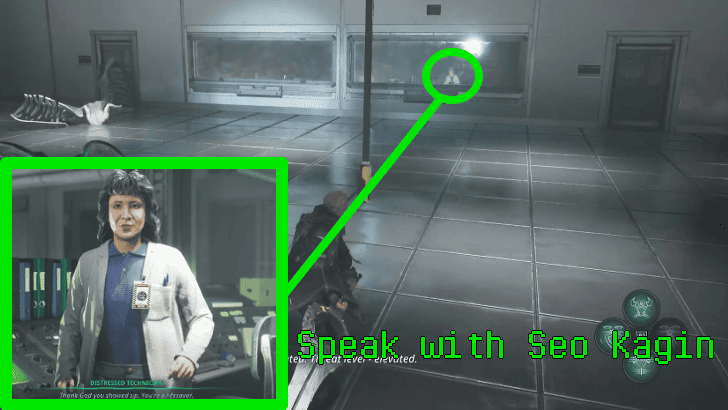 After completing the training, talk to the Distressed Technician, Seo Kagin, and exhaust her dialogue to receive the Keycard - Clearance Alpha. Move to the next area through the door in front of the room where Seo Kagin is, then use the keycard she gave you to unlock the room to the observatory. |
| 2.19 | 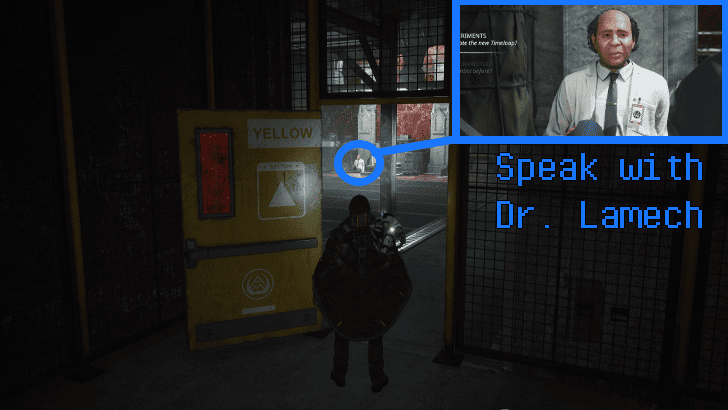 Flip the grid to yellow, then go back to the Timeloop room and exit through the yellow doors. Speak with the Traumatized Scientist, Dr. Balaam Lamech, sitting against the wall. He will give you the code for the terminal on B4 7584 and Amine Prisms. |
| 2.20 | 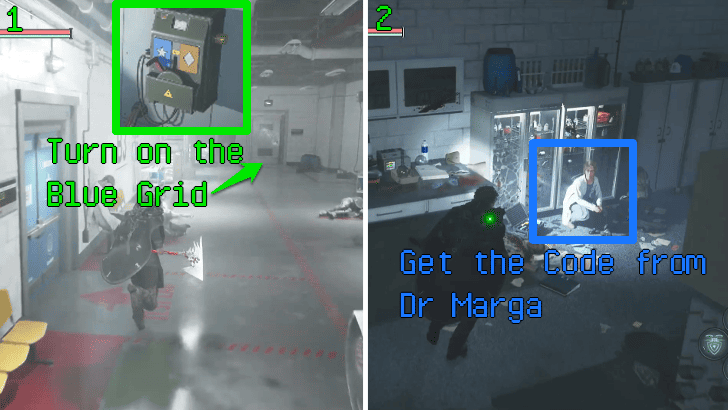 Head to floor B3 and progress through the area. You'll be using the keys you got earlier to unlock the path to the main hallway, using it again to the floor's maintenance room to access the grid switch. Activate the blue grid and enter the room Dr. Marga Hamill is in. This is located beyond the first blue door, as the first blue door consists of enemies. |
| 2.21 | 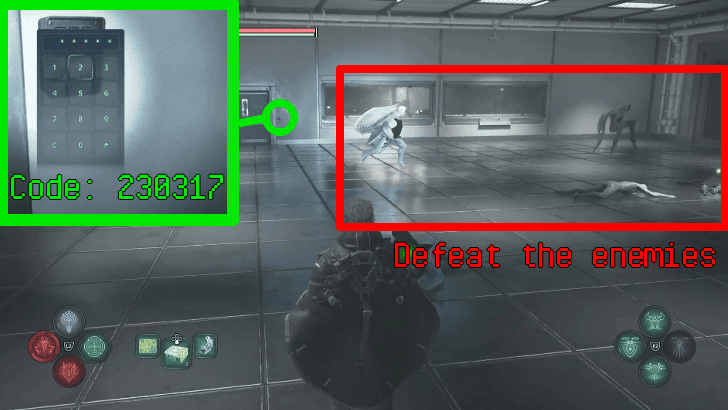 Speak with Dr. Marga Hamill and exhaust her dialogue to obtain the code to her lab. Return to the first blue door and defeat the enemies. Unlock her lab using the code: 230317 and pick up the Drone Processor. Return to Dr. Marga and trade the processor for her Keycard - Clearance Beta. |
| 2.22 |  Head to floor B4 and use both clearance keycards Beta and Alpha to unlock the red door. Ignore Doctor Mabden as he urges you to do the protocol and approach the terminal beside the loop |
| 2.23 | 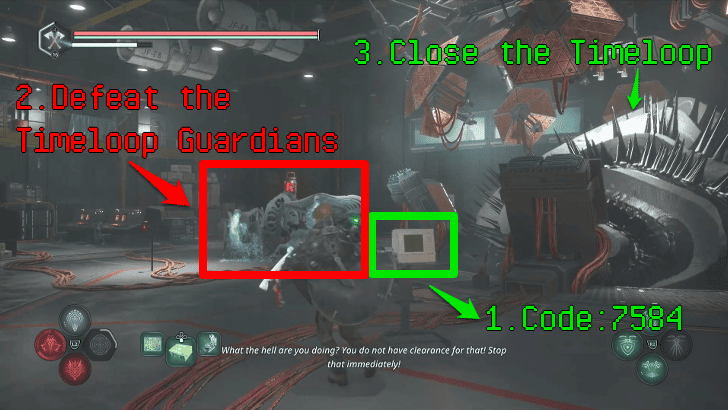 Access the computer and enter the code: 7584. Choose the available option to summon Timeloop Guardians. After the summoned enemy is defeated, activate the second option in the computer to summon another timeloop guardian. Defeating both will allow you to collapse the timeloop with an Amine Prism - Rho. |
| 2.24 |  Collect the Keystone of Rage from the red capsule in the room, then head down the ladder to collect the Keycard - Clearance Delta from the body on the floor. Exit the room and use the Delta keycard to unlock the room to access the elevator. Return to the APC and ask Tania about the Symbol of the Two-Headed Snake and travel back to Acasa Marshes. |
| ▲Return to List of All Act 2 Investigations▲ | |
Searching for the Keystone of Rage
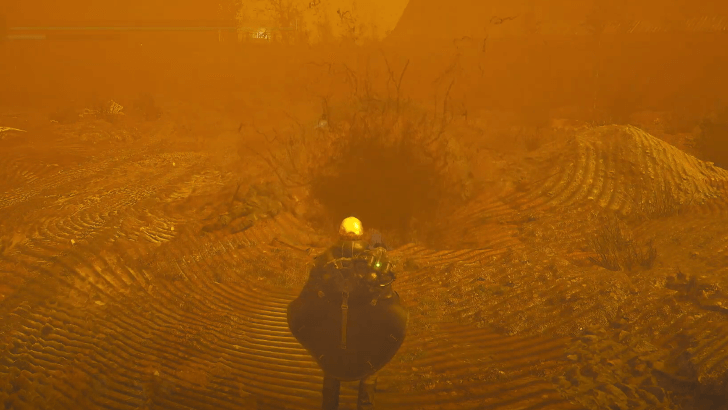
3. Searching for the Keystone of Ecstacy
| Objectives | |
|---|---|
| 3.1 | 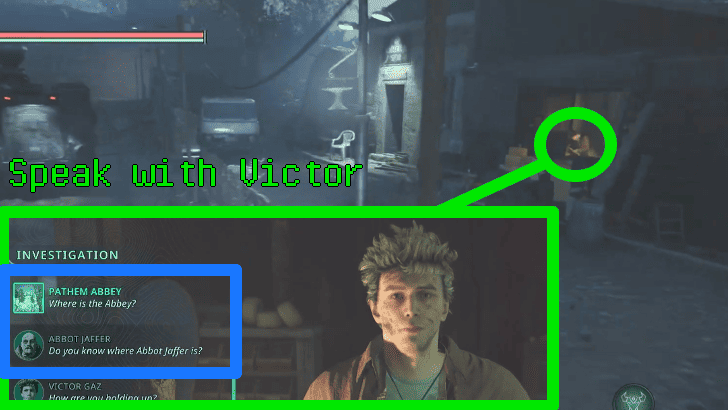 Travel to Acasa Marshes, a cut scene will play on the way. If you've spoken to Abbot Jaffer before, you can go to the Blacksmith Shop in Jova and speak with Victor. Ask him about Abbot Jaffer's location and where the Pathem Abbey is. Otherwise, you can use the map of the Acasa Marshes you got from Family Reunion to navigate to the Pathem Abbey. |
| 3.2 | 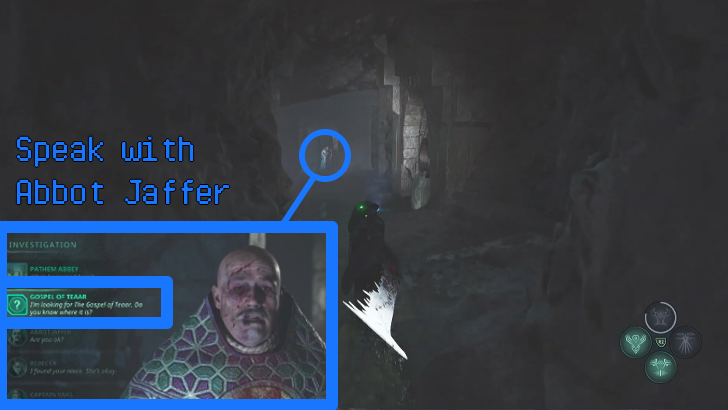 From the Village of Jova, head southeast to reach the abbey. Progress through the area to reach Abbot Jaffer, and ask him about the Gospel of Teaar to unlock travel to Lethe - National Library. Rotate the torch to the right and pull the lever to unlock the door. Return to the APC and travel to Lethe - National Library. |
| 3.3 | 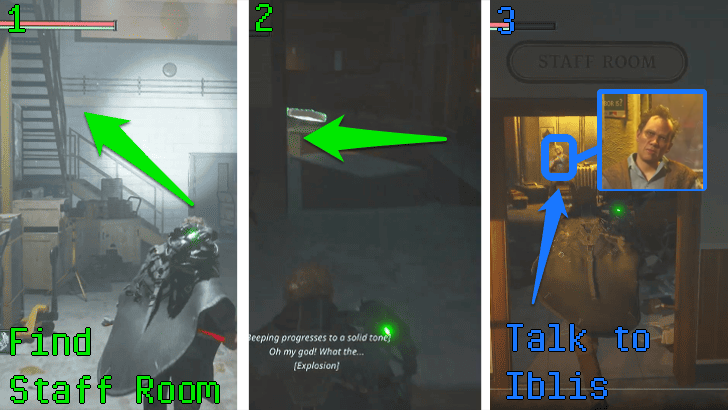 Enter the building and climb up the stairs until you reach the Staff Room. Speak with the Stoned Man, Iblis, and exhaust his dialogue to obtain the Lethe National Library keys. |
| 3.4 | 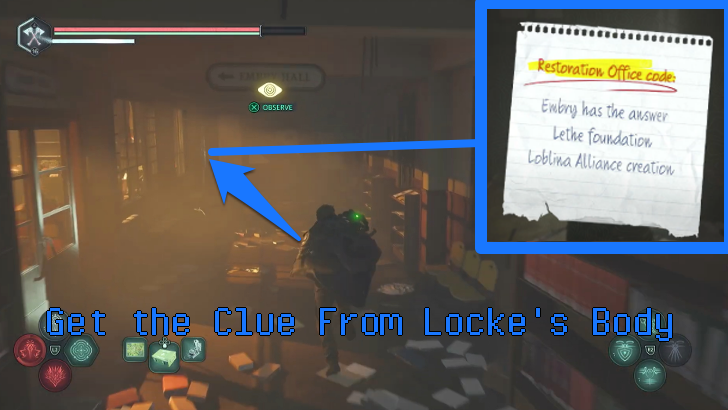 Backtrack until you reach the locked door with Locke's body. Use the key and defeat the enemy, and grab the clue from Locke's body. You can find the code by dropping down from the hole in the room where the helicopter is and collecting the scattered books, it is 537734. |
| 3.5 | 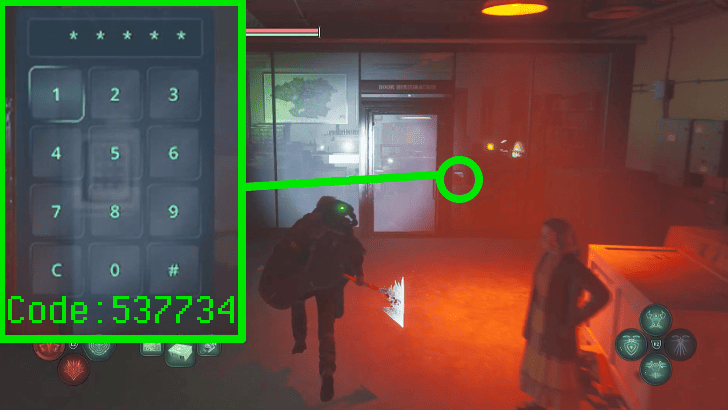 Head to the Book Restoration room and collect the Gospel of Teaar and the Twin-Headed Serpent. Return to the APC and speak with Tania about the Gospel of Teaar, travel to Vyssa Hills after that. |
| 3.6 |  At Vysa Hills, find the ruins with the snake symbol in the east near the Weeping Knight Statue. Since the gate is locked, you will need to make your way into the mines northwest to access it from inside.There will be a clue spray-painted on the side of the wall. Take note of the mice painting since it will guide you to where you need to go. Use the Twin-Headed Serpent to unlock the chest inside and obtain the Token of the Serpent. |
| 3.7 | 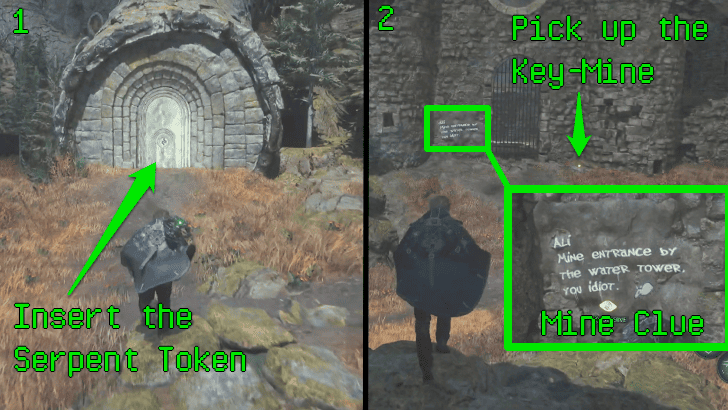 Head to the snake-like rock formation on the hill above the mine entrance and insert the Token of the Serpent in the door to unlock the entrance. Pick up the Key - Mine from the corpse near the gate. |
| 3.8 | 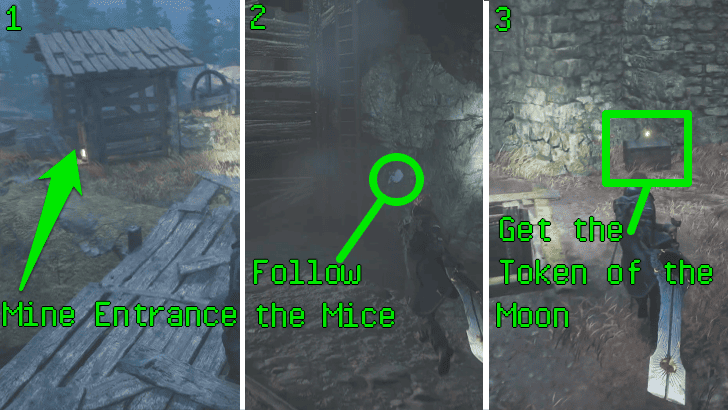 Climb the mountain and find the ladder beside the windmill near the wooden gate where you first met Tania Alver . Go down the ladder and use the Mine key to unlock the door to the next area. Follow the mice paintings until you reach the ladder, then climb up to go outside. Collect the Token of the Moon inside the chest. |
| 3.9 | 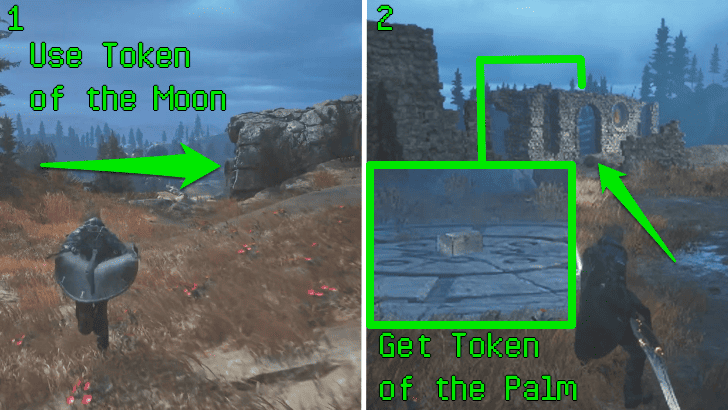 Go out the gate, this is the same area where you first found the mine key. Go to the Moon Door and insert the Token of the Moon to open it. Follow the path until you reach the area beside the Timeloop and grab the Token of the Palm from the chest. |
| 3.10 | 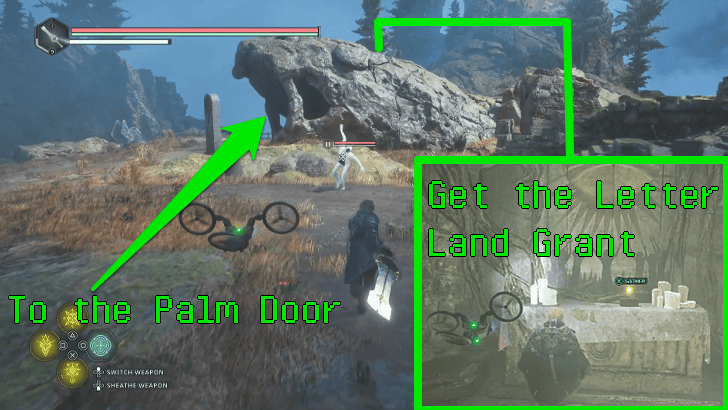 Go towards the rock formation that looks like a serpent's head and open the Palm Door using the Token of the Palm. Pick up the Letter - Land Grant from the altar to discover the new area Plains of Mist. |
| 3.11 | 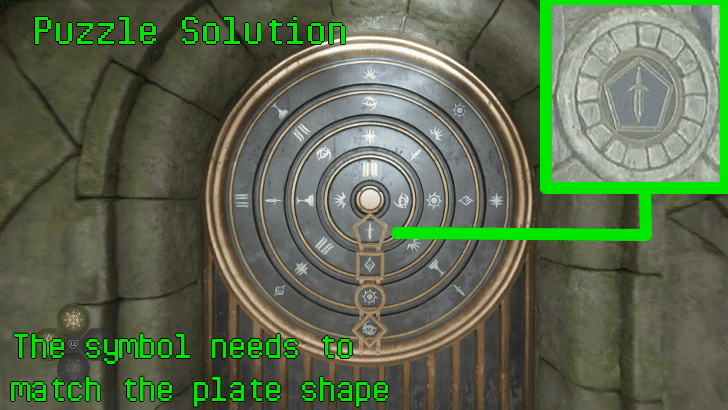 Go back to the APC and travel to the Plains of Mist. Find the Temple entrance and open the door with the Twin-Headed Serpent. There will be a puzzle on the next door. To get the code, find the metal plates in the ruins around the temple and match the symbols to the shape of their plates. From top to bottom its Sword, Diamond, Sun, and Eye. ▶︎Plains of the Mist Entrance Puzzle Guide |
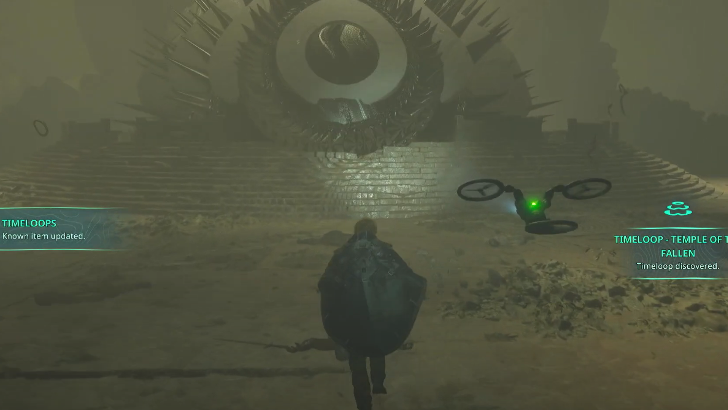
| 3.12 | 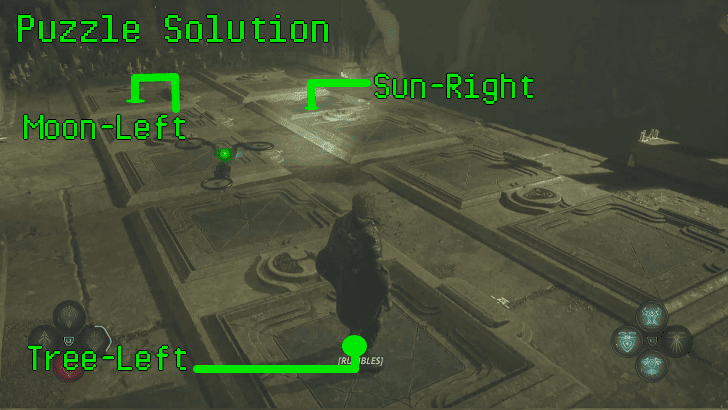 Enter the Temple of the Fallen and follow the path until you reach the Pressure Plate Puzzle, clues are on the tablets around the room. Use the pattern right of the Sun, left of the Moon, and left of the Tree. Enter the temple and defeat the enemies in your way until you reach the next Pressure Plate Puzzle in the room behind a large door with a snake symbol. ▶︎Temple of the Fallen Pressure Plate Puzzle 1 Guide |
| 3.13 | Gather clues from the four monoliths inside the temple. Step on the following tiles in this order Hands with Hourglass, Dagger Eye, Backstab, and Twin-Headed Snake. ▶︎Temple of the Fallen Pressure Plate Puzzle 2 Guide |
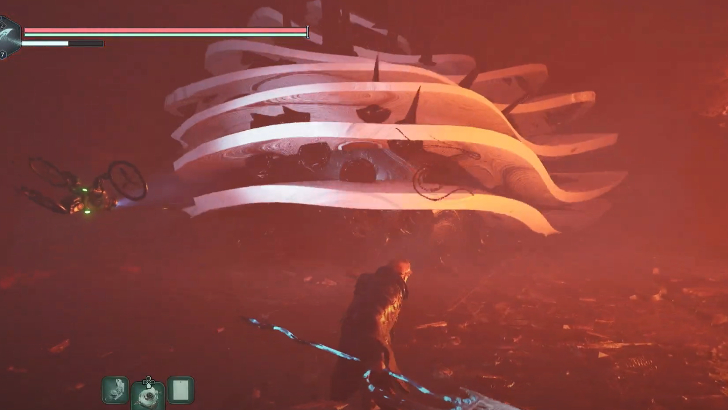
| 3.14 | Defeat the hordes of enemies in your way until you reach the final door. Touch the Keystone to trigger the boss battle, defeat the Ecstasy Boss by beating the small spawns until you destroy all the tiny altar-like structures and summon the boss's real body. |
| 3.15 | 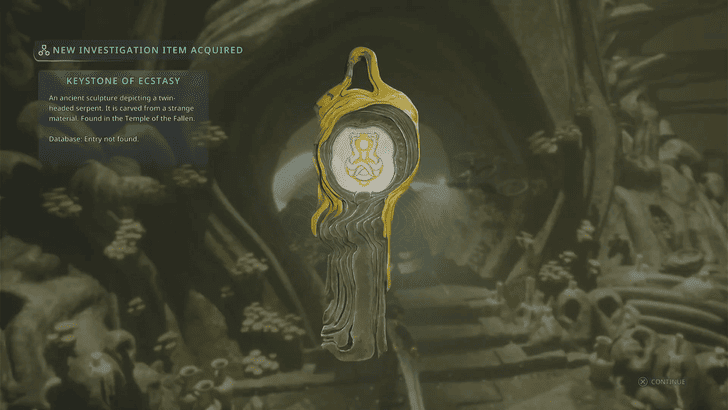 You will receive the Keystone of Ecstasy after you exit the Boss's domain, return to the APC, and prepare to return to the Lymbic Forge. |
| ▲Return to List of All Act 2 Investigations▲ | |
Searching for the Keystone of Ecstasy
Act 2 Full Exploration List
| Jump to a Section! | |
|---|---|
| Exploration Items | Research Items |
| Investigation Items | Timeloops |
| Amine Prisms | Mysteries |
| Good Deeds | - |
All Exploration Items
| ✔️ | Item | How to Get |
|---|---|---|
 Key - Auriga Locker Key - Auriga Locker
|
Found in Auriga Museum. Used in a locker in Auriga Museum. | |
 Key - Marastan Church Key - Marastan Church
|
Found in the caves near the town of Marastan Used in the Graveyard at Marastan. | |
 Keycard - Ministry Keycard - Ministry
|
Found on a corpse in Lethe. Unlocks a room in the office. | |
 Note - Cryptic Clue (National Library) Note - Cryptic Clue (National Library)
|
Found in the shipping docks at the National Library, Lethe. Part of the access code to be used in Computer Room D at Lethe National Library. | |
 Note - Favors Owed Note - Favors Owed
|
Found in the book restoration office at the National Library, Lethe. Used to open a safe in the Ministry of Cultural Primacy in Lethe. | |
 Note - Cryptic Clue (Talju) Note - Cryptic Clue (Talju)
|
Found in a bus stop in Talju. | |
 Diary - Crazy Week Diary - Crazy Week
|
Found of a corpse in Talju. Used as a hint for Supply Chain Mystery. | |
 Letter - Safe Delivery Letter - Safe Delivery
|
Found in a delivery truck at the Ministry of Cultural Primacy, Lethe. | |
 Note - Blackmailed Note - Blackmailed
|
Found in a locker at the National Library, Lethe. | |
 Letter - Daughter's Hope Letter - Daughter's Hope
|
Found in the archeological camp at the Jeljin cemetery. Contents of the letter contains a hint to complete the Never Worn Good Deed. | |
 Note - Cryptic Clue (Jeljin) Note - Cryptic Clue (Jeljin)
|
Found in the chapel of the Jeljin cemetery. Part of the access code to be used in Computer Room D at Lethe National Library. | |
 Note - Cryptic Maxim Note - Cryptic Maxim
|
Found on a corpse in the mines of Vyssa Hills. Used as hint to open a computer in Vyssa Hills. | |
 Note - Tithe Note - Tithe
|
Found in the caves near the town of Marastan. | |
 Letter - Getting Out Letter - Getting Out
|
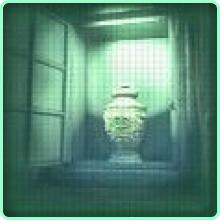
Found in an abandoned house in Marastan. Hints at where to bring the Urn in Marastan | |
 Note - Cryptic Clue (Ministry of Cultural Primacy) Note - Cryptic Clue (Ministry of Cultural Primacy)
|
Found at the Ministry of Cultural Primacy, Lethe. Part of the access code to be used in Computer Room D at Lethe National Library. | |
 Note - Cryptic Clue (Marastan) Note - Cryptic Clue (Marastan)
|
Found in the market of Marastan. | |
 OMSIF Deployment Order - National Library OMSIF Deployment Order - National Library
|
Found in the National Library, Lethe. Used as a hint to | |
 Recording - Aster Doorway 1 Recording - Aster Doorway 1
|
Found in Marton Ralst's office at the Ministry of Cultural Primacy, Lethe. | |
 Note - Rho - 021 Note - Rho - 021
|
Found in the storage room of Auriga Museum. Used to locate a hidden chest in Lymbic Forge | |
 APC Code Sheet APC Code Sheet
|
Found under the passenger seat in the OMSIF APC. | |
 Recording - Aster Doorway 2 Recording - Aster Doorway 2
|
Found in the archeological camp in Jeljin. Used to open Aster Doorway in Jeljin. | |
 Recording - Aster Doorway 3 Recording - Aster Doorway 3
|
Found on a corpse in the Jeljin digsite. Used to open Aster Doorway in Jeljin. | |
 Report - Confiscation Report - Confiscation
|
Found in a parked car at Ministry of Cultural Primacy, Lethe. Contents of the report indicate a second ymbic rod hidden inside of the Minstry of Cultural Primacy in Lethe. | |
 Lymbic Rod - Ecstasy, Z Lymbic Rod - Ecstasy, Z
|
Found in Vyssa Hills. Used to open Lymbic Chests and Lymbic Doors. | |
 Lymbic Rod - Grief, X Lymbic Rod - Grief, X
|
Found in the Auriga Museum. Used to open Lymbic Chests and Lymbic Doors. | |
 Lymbic Rod - Terror, Z Lymbic Rod - Terror, Z
|
Found near the Pathem Abbey in Acasa Marshes. Used to open Lymbic Chests and Lymbic Doors. | |
 Lymbic Rod - Rage, Y Lymbic Rod - Rage, Y
|
Found in Marastan. Used to open Lymbic Chests and Lymbic Doors. | |
 Lymbic Rod - Rage, V Lymbic Rod - Rage, V
|
Found in the Ministry of Cultural Primacy Used to open Lymbic Chests and Lymbic Doors. | |
 Symbol - Iron Crown Symbol - Iron Crown
|
Found in the storage room of Auriga Museum Unlock the Secret Room at the Entrance of the Museum | |
 Zoom Lens Zoom Lens
|
Found in a destroyed photography shop in Talju. Deliver to the Hermit in Acasa Marshes. | |
 Dog Collar Dog Collar
|
Obtained when freeing a dog in Jova, Acasa Marshes. Trade with Alban Vosh in Vyssa Hills. | |
 Signal Flare x4 Signal Flare x4
|
Found in a military supply creat in Talju. Given to the four survivors in Talju. | |
 Symbol - Flame Symbol - Flame
|
Found on a corpse in Talju. Open locked bunker in Senedra Forest. | |
 Map - Senedra Mountains Map - Senedra Mountains
|
Found on a corpse in Talju. Give to the Trapped Woman in Senedra Forest. | |
 Pill Bottle - Metformin Pill Bottle - Metformin
|
Found in a medical clinic in Talju. Given to the stranded ON Soldier in Acasa Western Monument. | |
 Keys - Samo's Spare Keys - Samo's Spare
|
Found in the general store in Marastan. Give to Dorno Grisibel. | |
 Gas Canister Gas Canister
|
Found at the docks below the town of Marastan. Trade with Korio Della in Marastan. | |
 Key - Antenna Key - Antenna
|
Found on a soldier's corpse in the Marastan woods. Used to shutdown the transmissioned message. | |
 Lymbic Rod - Terror, V Lymbic Rod - Terror, V
|
Found in the crypts below Marastan. Used to open Lymbic Chests and Lymbic Doors. | |
 Key - Rusted (Arcas Spire) Key - Rusted (Arcas Spire)
|
Found in the Arcas Spire. Unlocks a Chest in Arcas Spire | |
 Key - Brass Key - Brass
|
Found in the Arcas Spire. Used to open a locked chest in Arcas Spire. | |
 Golden Clover Golden Clover
|
Found After Collapsing Pathem Abbey Timeloop Used to unlock the a grave at Jova with a clover insignia. | |
 Urn Urn
|
Found in Marastan. Show to Edwyn Tosan. | |
 Key - Columbarium Key - Columbarium
|
Given by Edwyn Tosan. Opens the columbarium in the mausoleum. | |
 Fuse Fuse
|
Found in a mechanic's shop in Marastan. Used to restore power to the houses in Marastan. | |
 Woman's Clothing Woman's Clothing
|
Found in an office at the Ministry of Cultural Primacy in Lethe. Give to Mireille Dallaire. | |
 Official Hadean Stamp Official Hadean Stamp
|
Found in a locked office at the Ministry of Cultural Primacy in Lethe. Give to Agathe Terra. | |
 ID Cards - Blank ID Cards - Blank
|
Found in an office at the Ministry of Cultural Primacy in Lethe. Give to Agathe Terra. | |
 Key - Archeology Camp Key - Archeology Camp
|
Found in the caves under the archeological camp in Jeljin cemetery. Opens the locker in the archeological camp. | |
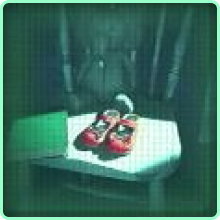
 Shoes - Red Shoes - Red
|
Found in the archeological camp at the Jeljin cemetery. Taken back to a house in Jova. | |
 Ring - Hand-Made Ring - Hand-Made
|
Found on a corpse in Cell 02 of the prisoner block in Auriga Museum. Give to Dag Samason in Senedra Forest. | |
 Cigarette Case Cigarette Case
|
Found on a corpse in Cell 04 of the prisoner block in Auriga Museum. Give to Elzina Tibor in Marastan. | |
 Satellite Radio Satellite Radio
|
Found on the corpse of an ON soldier in the Ministry of Cultural Primacy in Lethe. Give to stranded ON soldier in the Monolith in Acasa Marshes. | |
 Keys - Car (Lethe) Keys - Car (Lethe)
|
Found in a locket at the National Library, Lethe. Used to Unlock a Parked Car. | |
 Keys - Ministry Car Keys - Ministry Car
|
Found in an office of the Ministry of Cultural Primacy, Lethe. Used to unlock a car at Lethe Ministry of Cultural Primacy. | |
 Lymbic Rod - Ecstasy, V Lymbic Rod - Ecstasy, V
|
Found inside the Temple of the Fallen. Used to open Lymbic Chests and Lymbic Doors. | |
 Lymbic Rod - Ecstasy, W Lymbic Rod - Ecstasy, W
|
Found inside the Temple of the Fallen. Used to open Lymbic Chests and Lymbic Doors. | |
 Lymbic Rod - Ecstasy, X Lymbic Rod - Ecstasy, X
|
Found in the trunk of a car at the Lethe Ministry of Cultural Primacy. Used in the Blackmailed Mystery | |
 Lymbic Rod - Ecstasy, Y Lymbic Rod - Ecstasy, Y
|
Found in Minstry of Cultural Primacy, Lethe. Used in the Blackmailed Mystery | |
 Lymbic Rod - Rage, X Lymbic Rod - Rage, X
|
Found inside the excavation site in Jeljin Used to open Lymbic Chests and Lymbic Doors. | |
 Lymbic Rod - Rage, Z Lymbic Rod - Rage, Z
|
Found inside Caspian's Basement in Talju. Used to open Lymbic Chests and Lymbic Doors. | |
 Key - Mossy Key - Mossy
|
Found in the Plains of Mist. Unlocks the Hidden Chest near the Temple of the Fallen. | |
 Bottle of Mead - Full Bottle of Mead - Full
|
Found at the Mead Distillery After Rescuing Abbot Jaffer at Lake Cynon. Give to the thirsty soldier at Jova. | |
 Note - Exodus Note - Exodus
|
Found in a run down structure in Plains of Mist. Gives a clue to what the Key - Barrel may unlock. | |
 Key - Barrel Key - Barrel
|
Found in a run down structure in Plains of Mist. The key unlocks a chest found in Vyssa Hills. | |
 Newspaper - Sports Result Newspaper - Sports Result
|
Found a corpse in the Marastan woods. |
All Research Items
| ✔️ | Item | How to Get |
|---|---|---|
 Ceremonial Key Ceremonial Key
|
Found on a shelf after resolving the Timeloop at Auriga Museum. | |
 Skull in Box Skull in Box
|
Found in the Temple of the Fallen at Plains of Mist. | |
 Flower Medallion Flower Medallion
|
Found at Vyssa Hills. | |
 Bowl of Ash Bowl of Ash
|
Found behind a Lymbic Door in the Lymbic Forge at Lake Cynon. | |
 Box of Bullets Box of Bullets
|
Found inside Auriga Musuem in the Drone Training room. | |
 Bronze Cup Bronze Cup
|
Located within Lymbic Forge Timeloop. | |
 Bronze Figurine Bronze Figurine
|
Found after closing the Timeloop in Vyssa Hills | |
 Burnt Notes Burnt Notes
|
Found in a drawer beside a corpse in a room next to Marton Ralst's Office. | |
 Children's Book Children's Book
|
Found in Marastan. | |
 Citizen's File Citizen's File
|
Found in a shed in Marastan. | |
 Clay Vase Clay Vase
|
TBD
|
|
 Crown of Bones Crown of Bones
|
Found at the top of Arcas Spire. | |
 Cufflinks Cufflinks
|
Found in the locked bunker in Senedra Forest. | |
 Faded Parchment Faded Parchment
|
Found in Arcas Spire. | |
 Jewelled Dagger Jewelled Dagger
|
Found in Arcas Spire. | |
 Lymbic Core Lymbic Core
|
Found in Marastan. | |
 Marked Door Polaroid Marked Door Polaroid
|
Found in Jeljin Cemetery. | |
 Pocket Watch Pocket Watch
|
Found on a stone bench in Jeljin. | |
 Pottery Fragment Pottery Fragment
|
Found inside the trunk of a blue car at Lethe National Library. | |
 Rusted Gauntlet Rusted Gauntlet
|
Found in the Plains of Mist. | |
 Worn Journal Worn Journal
|
Found in Talju. | |
 Ancient Scroll Ancient Scroll
|
Found inside Lymbic Door - Senedra Hilltop. | |
| Wooden Mask | Found in a safe at Lethe - National Library. | |
 Prison Manifest Prison Manifest
|
Found in the Captain's Office in the Village of Jova. | |
 Wooden Horse Figurine Wooden Horse Figurine
|
Found inside the catacombs in the secret underground area, at a Marastan graveyard. |
All Investigation Items
| ✔️ | Item | How to Get |
|---|---|---|
 Keystone of Terror Keystone of Terror
|
Found inside the Arcas Spire Used in the Lymbic Forge. | |
 Keystone of Rage Keystone of Rage
|
Found inside Auriga Museum. Used in the Lymbic Forge. | |
 Keystone of Ecstasy Keystone of Ecstasy
|
Found in the Temple of the Fallen. Used in the Lymbic Forge. | |
 Gospel of Teaar Gospel of Teaar
|
Found in the book restorer's office at the Lethe National Library. | |
 Journal - Auriga Entrance Journal - Auriga Entrance
|
Found in Marton Ralst's safe at the Ministry of Cultural Primacy, Lethe. Used to unlock Auriga Museum entrance | |
 Historical Lethe - City of Wonder Historical Lethe - City of Wonder
|
Found in the National Library. | |
 The Loblina Alliance The Loblina Alliance
|
Found in the National Library. | |
 Lady Marguerith: Scandal and Steel Lady Marguerith: Scandal and Steel
|
Found in the National Library. Used to solve the passcode in the Book Restoration Office | |
 Keys - Maintenance Keys - Maintenance
|
Found on a desk in the Auriga Museum. | |
 Keycard - Clearance Delta Keycard - Clearance Delta
|
Found on a corspe in the Auriga Museum | |
 Keycard - Clearance Beta Keycard - Clearance Beta
|
Obtained in the Auriga Museum. Used on a security door in B4 Auriga Museum. | |
 Keycard - Clearance Alpha Keycard - Clearance Alpha
|
Obtained in the Auriga Museum. Used on a security door in B4 Auriga Museum. | |
 Key - Mine Key - Mine
|
Found on a corpse in Vyssa Hills. | |
 Scroll - Queen's Eulogy Scroll - Queen's Eulogy
|
Found in the sarcophagus of the Blood Queen in Marastan. Used to unlock the Arcas Spire | |
 Marton Ralst's Wallet Marton Ralst's Wallet
|
Found on a corpse at the Ministry of Cultural Primacy in Lethe. Used to find the code for Marton Ralst's computer | |
 Map of Hadea - Ancient Map of Hadea - Ancient
|
Found in the sealed chamber below the Jeljin church | |
 Map of Talju Map of Talju
|
Obtained from the first NPC you talk to in Talju. Used to locate the house of Caspian Fran. | |
 Scroll - General Aarlon's Note Scroll - General Aarlon's Note
|
Found atop the Arcas Spire. Used to locate the Keystone of Terror | |
 Letter - Land Grant Letter - Land Grant
|
Found in the church ruins high in the Vyssa Hills Used to unlock Plains of Mist | |
 Drone Processor Drone Processor
|
Found inside in Auriga Museum Give to Dr. Marga Hamil | |
 Ancient Lymbic Forging Ancient Lymbic Forging
|
Found in the storage room of Auriga Museum Give to Victor Gaz in Jova. | |
 Key - Pharmacy Key - Pharmacy
|
Found on a corpse in Talju. Used to open the Pharmacy. | |
 Walkie-Talkie Walkie-Talkie
|
Obtained from Caspian Fran in Talju. Give to Lukhan Fran. | |
 Key - Parking Lot Key - Parking Lot
|
Obtained from Caspian Fran in Talju. Used to open the parking lot in Talju. | |
 Key - Statue Key - Statue
|
Obtained from the caretaker, Talis Arthiom, in Marastan. Used to access the Blood Queen observatory. | |
 Tablet Fragment - Square Tablet Fragment - Square
|
Found in the crypts below Marastan. Unlock the Door in Marastan Ruins. | |
 Tablet Fragment - Oblique Tablet Fragment - Oblique
|
Found in the crypts below Marastan. Unlock the Door in Marastan Ruins. | |
 Tablet Fragment - Angled Tablet Fragment - Angled
|
Found in the crypts below Marastan. Unlock the Door in Marastan Ruins. | |
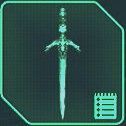
 Sword of the Blood Queen Sword of the Blood Queen
|
Found in the sarcophagus of the Blood Queen in Marastan. Unlocks the Arcas Spire in Senedra Forest. | |
 Gear - Spire Gear - Spire
|
Found in the Arcas Spire. Used to complete the elevator in the Arcas Spire. | |
 Advanced Lymbic Forging Advanced Lymbic Forging
|
Found in the Arcas Spire. Give to Victor Gaz. | |
 Key - Rusted (Arcas Spire Timeloop) Key - Rusted (Arcas Spire Timeloop)
|
Found on a balcony of the Arcas Spire. Used to open a door in the Arcas Spire. | |
 Keys - Crane Keys - Crane
|
Found on a corpse in the Jeljin cemetery. | |
 Iron Seal - Fading Iron Seal - Fading
|
Found in the sealed chamber below the Jeljin church. Used to unlock Auriga Museum. | |
 Iron Seal - Rising Iron Seal - Rising
|
Found in Marton Ralst' safe at the Ministry of Cultural Primacy, Lethe. Used to unlock Auriga Museum. | |
 Keys - Maintenance (Auriga Museum) Keys - Maintenance (Auriga Museum)
|
Found on a desk in the Auriga Museum. Used to open multiple doors in the Auriga Museum. | |
 Token of the Serpent Token of the Serpent
|
Found in the ruins of Vyssa Hills. Used to open the snake structure in Vyssa Hills. | |
 Token of the Moon Token of the Moon
|
Found in the ruins of Vyssa Hills. | |
 Token of the Palm Token of the Palm
|
Found in the ruins of Vyssa Hills. Used to open the door in the serpent head structre in Vyssa Hills. | |
 Twin-Headed Serpent Twin-Headed Serpent
|
Found in the book restorer's office at the Lethe National Library. Unlocks a temple and opens a locked chest in Vyssa Hills. |
All Timeloops
| ✔️ | Timeloop | How to Solve |
|---|---|---|
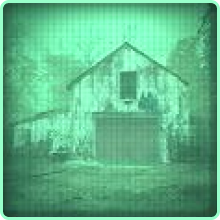
 Pathem Abbey |
This Timeloop is located inside the Pathem Abbey, accessible when you are looking for Abbot Jaffer. When you reach the area with the pit climb down and climb the second ladder beside it. Follow the path until you see the loop. | |
 Vyssa Hills |
This Timeloop is near the second Serpent's Head following the Serpent's body across Vyssa Hills. It is beside the Palm Ruin with the gigantic Primeval Statues. | |
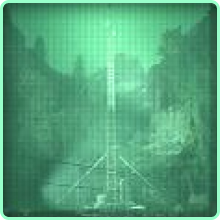
 Arcas Spire |
The Timeloop in Arcas Spire is located in the middle of the big arena. You'll see flags on the path to it. The Timeloop itself has a huge size so it's easy to see as well. | |
 Talju |
The Talju Timeloop is on the outskirts of the city and in the soil. Go through a broken wall and follow the tracks on the soil until you see the Timeloop. | |
 Marastan |
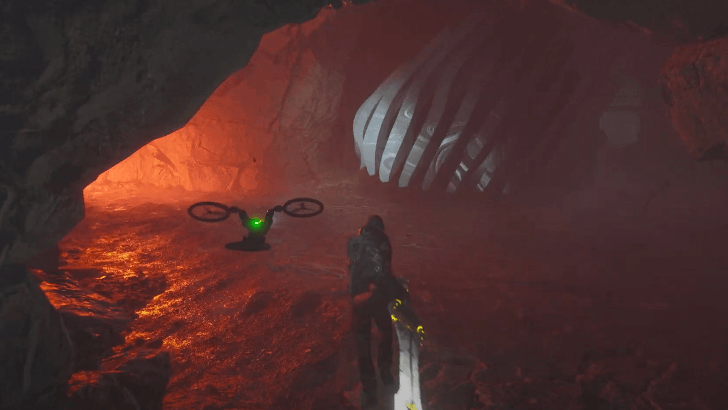
The Marastan Timeloop is inside of some ruins outside the town. Cross the water and you'll see some ruins with moss. Go through the ruins and you'll see the Timeloop. | |
 Temple of the Fallen |
The Temple of the Fallen Timeloop is located at the entrance of the temple. Once you enter the temple, you'll immediately see it in the middle. | |
 Jeljin |
The Jeljin Timeloop is located inside the tunnels below the digsite. Just follow the tunnels until you see a ladder that takes you up to the Timeloop./td> | |
 Auriga Museum 1 |
The first Auriga Museum Timeloop is through the door that leads into the cells and and open the locked door at the end of the corridor. The timeloop will be in the middle of the room. | |
 Auriga Museum 2 |
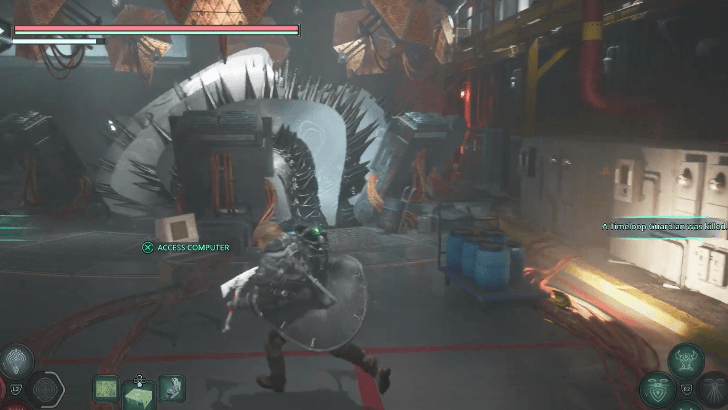
The second Auriga Museum Timeloop is located in floor B4 and is where you talk with Doctor Mabden. It will be by a computer where you can summon its last Guardians. |
All Timeloop and Guardian Locations
All Amine Prisms
| ✔️ | Amine Prism | How to Get |
|---|---|---|
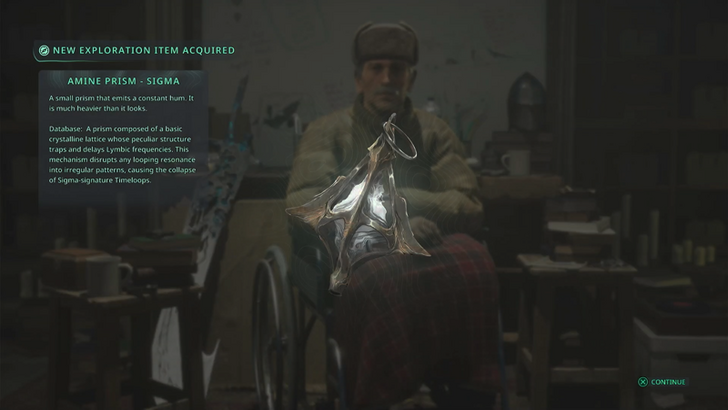
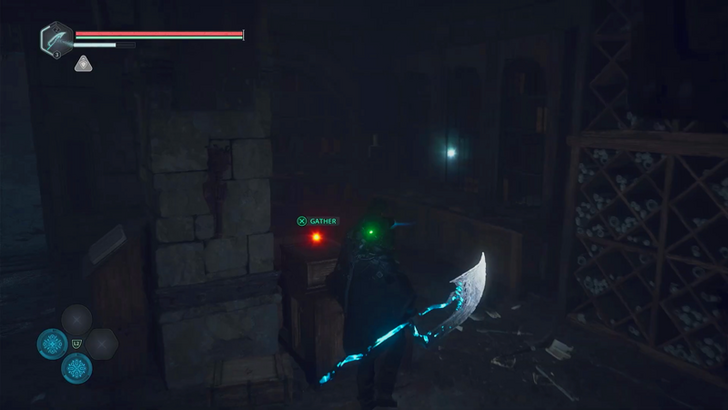 Amine Prism - Sigma |
This prism is found inside the Vault of Forbidden Knowledge in Senedra Forest. | |
 Amine Prism - Sigma |
Gildas Brom will give a Sigma Prism when you first encounter him in the Watcher's Nest. | |
 Amine Prism - Sigma |
This prism can be found inside the Lymbic Forge. After unlocking the Crypt Elevator and defeating the Timeloop Guardian in the crypt, the prism can be taken from the wall behind the coffin in the middle of the crypt. |
All Mysteries
| ✔️ | Items | How to Get |
|---|---|---|
 Ascetic Vows Ascetic Vows
|
Type:
Mysteries
Location: Temple of the Fallen |
|
 Blackmailed Blackmailed
|
Type:
Mysteries
Location: Lethe - Ministry of Cultural Primacy |
|
 Emergency Stash Emergency Stash
|
Type:
Mysteries
Location: Arcas Spire |
|
 Family First Family First
|
Type:
Mysteries
Location: Jeljin |
|
 Great Responsibility Great Responsibility
|
Type:
Mysteries
Location: Auriga Museum |
|
 History Lesson History Lesson
|
Type:
Mysteries
Location: Talju |
|
 Ill-Gotten Gains Ill-Gotten Gains
|
Type:
Mysteries
Location: Marastan |
|
 Lax Security Lax Security
|
Type:
Mysteries
Location: Auriga Museum |
|
 Locked Down Locked Down
|
Type:
Mysteries
Location: Marastan |
|
 Lymbic Chest - Jeljin Archeology Camp Lymbic Chest - Jeljin Archeology Camp
|
Type:
Mysteries
Location: Jeljin |
|
 Lymbic Chest - Lymbic Forge Waterfall Lymbic Chest - Lymbic Forge Waterfall
|
Type:
Mysteries
Location: Auriga Museum |
|
 Lymbic Chest - Marastan Ruins Lymbic Chest - Marastan Ruins
|
Type:
Mysteries
Location: Marastan |
|
 Lymbic Chest - Temple of the Fallen Lymbic Chest - Temple of the Fallen
|
Type:
Mysteries
Location: Temple of the Fallen |
|
 Overgrown Overgrown
|
Type:
Mysteries
Location: Plains of Mist |
|
 Righteous Protection Righteous Protection
|
Type:
Mysteries
Location: Arcas Spire |
|
 Supply Chain Supply Chain
|
Type:
Mysteries
Location: Talju |
|
 Suspicious Activity Suspicious Activity
|
Type:
Mysteries
Location: Lethe - National Library |
|
 The Conspiracy The Conspiracy
|
Type:
Mysteries
Location: Lethe - National Library |
|
 The Hideout The Hideout
|
Type:
Mysteries
Location: Talju |
|
 Whistleblowers Whistleblowers
|
Type:
Mysteries
Location: Auriga Museum |
All Good Deeds
| ✔️ | Items | How to Get |
|---|---|---|
 A Light in the Dark A Light in the Dark
|
Type:
Good Deed
Location: Talju Deadline: Before the evaucation truck leaves Talju. |
|
 A Way Out A Way Out
|
Type:
Good Deed
Location: Lethe - National Library |
|
 Family Feud Family Feud
|
Type:
Good Deed
Location: Jeljin |
|
 Incognito Incognito
|
Type:
Good Deed
Location: Lethe - Ministry of Cultural Primacy Deadline: Leaving the Lethe Propaganda Building without helping the ON Soldier. |
|
 Insult to Injury Insult to Injury
|
Type:
Good Deed
Location: Marastan |
|
 Mementos Mementos
|
Type:
Good Deed
Location: Auriga Museum |
|
 Never Worn Never Worn
|
Type:
Good Deed
Location: Jeljin |
|
 Power to the People Power to the People
|
Type:
Good Deed
Location: Marastan |
|
 Samo's Keys Samo's Keys
|
Type:
Good Deed
Location: Marastan |
|
 Separated Separated
|
Type:
Good Deed
Location: Jeljin |
|
 The Depths of Hell The Depths of Hell
|
Type:
Good Deed
Location: Marastan |
Hell is Us Related Guides
Story Walkthrough and List of All Acts
Complete Walkthrough
| Act | Investigation |
|---|---|
| Act 1 | • Family Reunion
• Family Legacy |
| Act 2 | • Searching for the Keystone of Terror
• Searching for the Keystone of Rage • Searching for the Keystone of Ecstasy |
| Act 3 | • Into the Unknown |
100% Location Completion Guide
| List of All Locations | ||
|---|---|---|
| Senedra Forest | Acasa Marshes | Vyssa Hills |
| Lake Cynon | Lethe - National Library | Plains of Mist |
| Marastan | Talju | Lethe - Ministry of Cultural Primacy |
| Jeljin | Auriga Museum | - |
| Sub-Areas | ||
| Watcher's Nest | ||
Comment
Author

Act 2 Complete Walkthrough and Secrets
Rankings
- We could not find the message board you were looking for.
Gaming News


Popular Games

Genshin Impact Walkthrough & Guides Wiki
Hollow Knight: Silksong Walkthrough & Guides Wiki
Umamusume: Pretty Derby Walkthrough & Guides Wiki
Borderlands 4 Walkthrough & Guides Wiki
Wuthering Waves Walkthrough & Guides Wiki
Honkai: Star Rail Walkthrough & Guides Wiki
Pokemon TCG Pocket (PTCGP) Strategies & Guides Wiki
Pokemon Scarlet and Violet (SV) Walkthrough & Guides Wiki
Zenless Zone Zero Walkthrough & Guides Wiki
Clair Obscur: Expedition 33 Walkthrough & Guides Wiki


Recommended Games
Once Human Walkthrough & Guides Wiki
Fire Emblem Heroes (FEH) Walkthrough & Guides Wiki
Yu-Gi-Oh! Master Duel Walkthrough & Guides Wiki
Persona 3 Reload Walkthrough & Guides Wiki
Black Myth: Wukong Walkthrough & Guides Wiki
The Legend of Zelda: Tears of the Kingdom Walkthrough & Guides Wiki
Super Smash Bros. Ultimate Walkthrough & Guides Wiki
Monster Hunter World Walkthrough & Guides Wiki
Diablo 4: Vessel of Hatred Walkthrough & Guides Wiki
Elden Ring Shadow of the Erdtree Walkthrough & Guides Wiki


All rights reserved
©2025 – Nacon
The copyrights of videos of games used in our content and other intellectual property rights belong to the provider of the game.
The contents we provide on this site were created personally by members of the Game8 editorial department.
We refuse the right to reuse or repost content taken without our permission such as data or images to other sites.